Android WebView Setup
Are you sure you want to use this instead of the Android Mobile SDK?This page is about Arkose Labs' Webview direct integrations approach for Android. Note: Rather than using this approach and having to write significant code yourself, we strongly urge you to use our Android Mobile SDK. Arkose will continue to improve and add functionality to the Android Mobile SDK that will not be added to the following Webview direct integration approach.
Overview
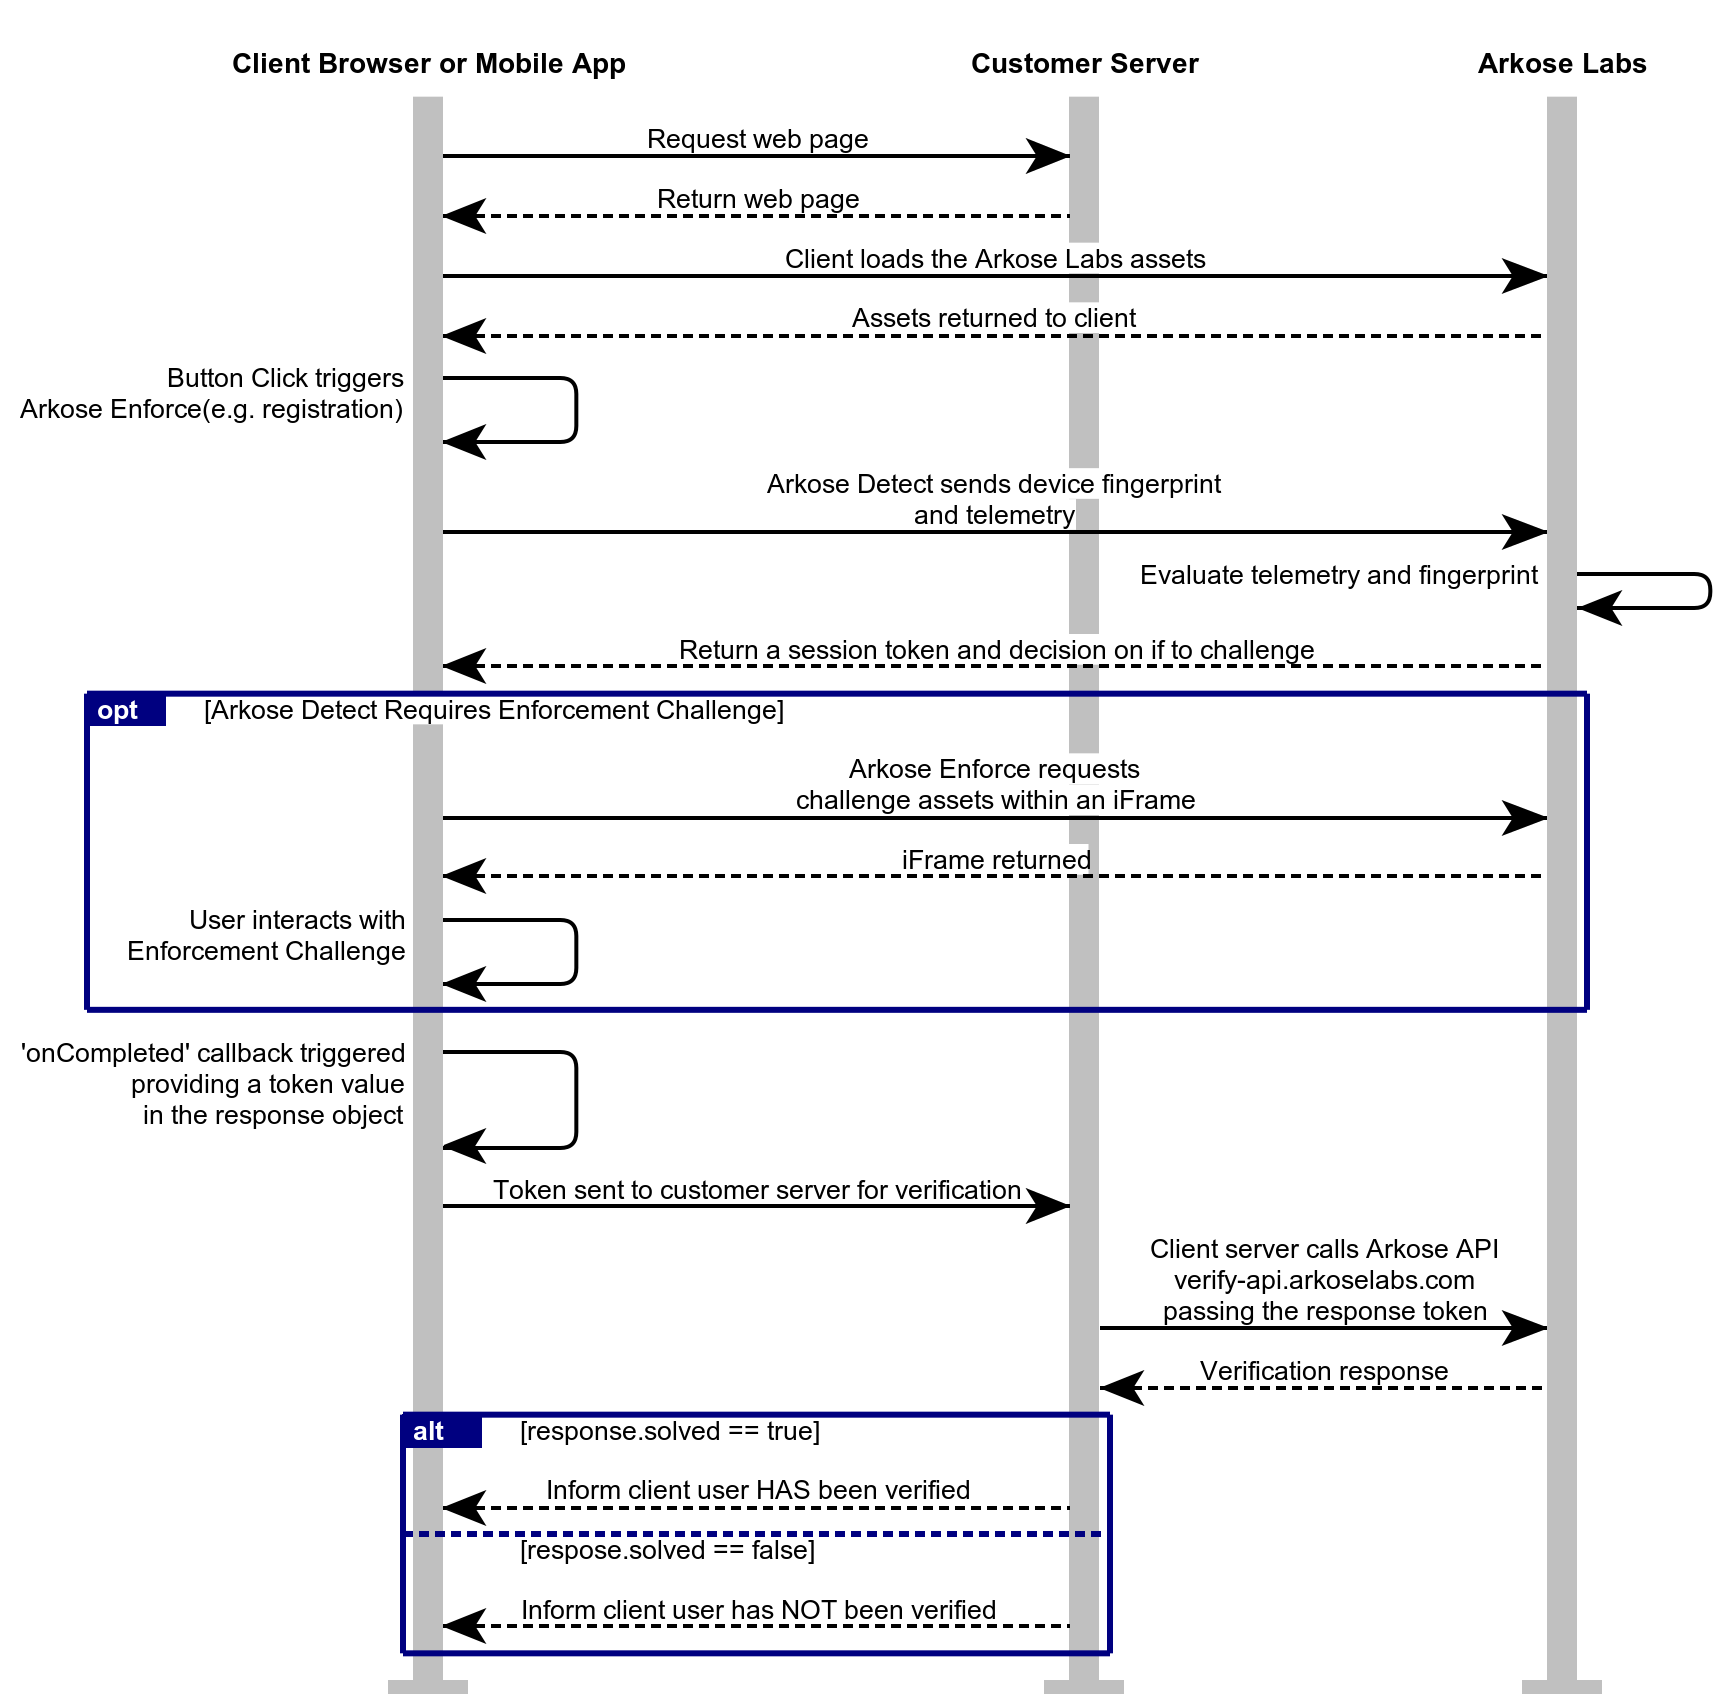
There are two required steps to fully implement Arkose Bot Manager:
Client-side implementation that allows Arkose Bot Manager to collect data necessary to classify the traffic from the client, display an Enforcement Challenge (EC) if necessary, and provide a one-time use token.
Server-side implementation that takes the token provided by the client-side and verifies it with the Arkose Labs Verify API. The result is a response that contains information about the session, either in a simple format or as a JSON.
This guide includes client-side set up information for a native Android app and links to server-side instructions. An example implementation Android project is available on request through your CSM (Customer Success Manager).
Arkose Bot Manager can be implemented into your Android app by triggering a web view from the button used to submit the data server-side in the flow you are protecting.

Demo video
If using our enforcement component, see the results of installing the Enforcement Challenge on Android in this 30 seconds screen capture recording of the example project. Note that you need to click the start arrow button at the left bottom of the image for it to begin playing. Demo.
API Request Authentication
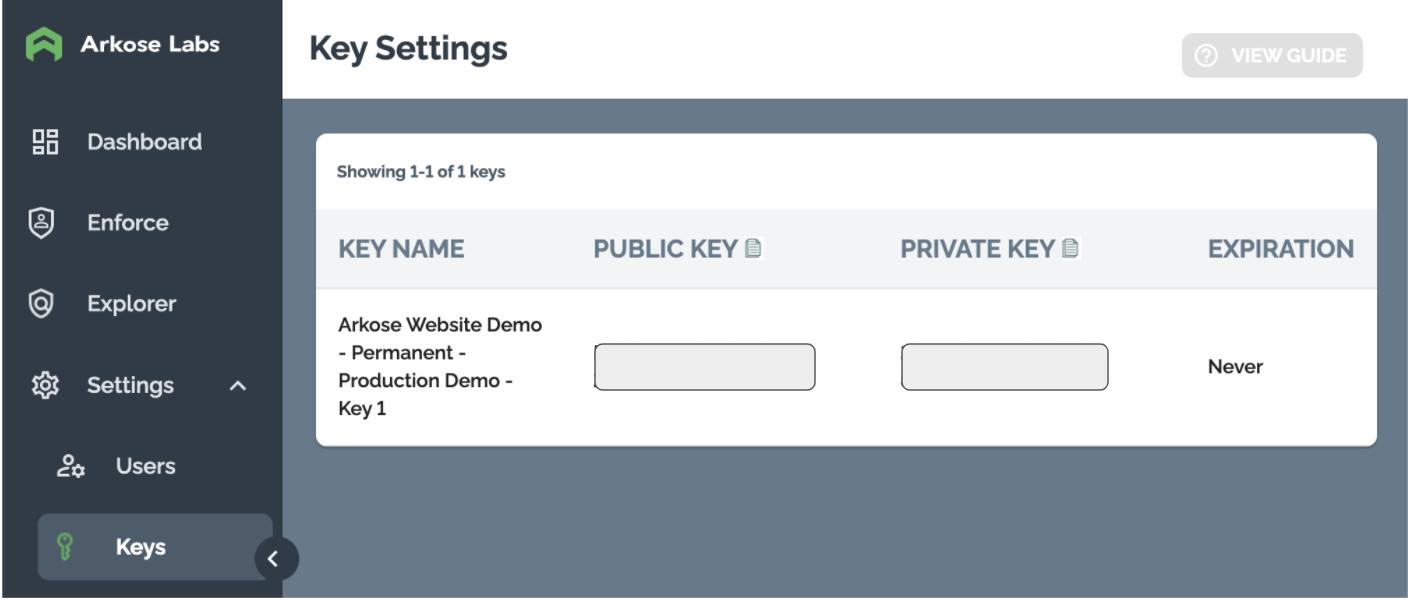
Arkose Labs authenticates your API requests using a private/public key pair that can be retrieved from the Key Settings page of the Arkose Labs Command Center. As shown below, go to the left menubar's Settings entry, and then to the Keys sub-entry. If you do not have access to the Command Center or do not have your private and public keys, contact your Sales Rep or Sales Engineer.

The private key is needed to authenticate when using the Verify API. This private key must not be published on a client facing website, and must only be used on your server-side implementation on the Arkose Labs Verify API.
Client-Side Set Up for Android
- To support WebView in Android, ensure the request INTERNET permission is in the manifest file. You should see a line in the manifest file that looks like the following code. If it is not there, you must add it.
<uses-permission android:name="android.permission.INTERNET" />- To load the WebView into your application the
<webview>element needs to be included into the app's activity layout, as shown in the code below:
<?xml version="1.0" encoding="utf-8"?>
<WebView xmlns:android="http://schemas.android.com/apk/res/android"
android:id="@+id/webview"
android:layout_width="match_parent"
android:layout_height="match_parent"
/>-
- If using our enforcement component, define an
index.htmlfile in your Android assets folder. Add the code shown below, adjusted to fit your implementation. This file will be loaded into theWebViewand will render the Enforcement Challenge (EC). On the callback event there are two functions that callback to Java to return the Arkose Labs session token and then close the WebView windows. See the Enforcement code below. - If using our detection component, define an
ArkoseLabsAPI.htmlfile in your Android assets folder. Add the code shown below, adjusted to fit your implementation. This file will be loaded into theWebViewand will render our detection component. On the callback event there are two functions that callback to Java to return the Arkose Labs session token and then close the WebView windows. See the Detection code below.
- If using our enforcement component, define an
<html>
    <head>
        <meta name="viewport" content="width=device-width, initial-scale=1.0, maximum-scale=1, user-scalable=0"/>

        <!-- Setup the Arkose API -->
       <!--
    Include the Arkose Labs API in the <head> of your page. In the example below, remember to
    replace <company> with your company's personalized Client API URL name, and replace <YOUR_PUBLIC_KEY> with the public key supplied to you by Arkose Labs, and
    e.g. <script src="//client-api.arkoselabs.com/v2/<YOUR_PUBLIC_KEY>/api.js" data-callback="setupEnforcement" ></script>
     -->

        <script data-callback="setupEnforcement"
                src="https://<company>-api.arkoselabs.com/v2/<YOUR_PUBLIC_KEY>/api.js" ></script>

        <script type="text/javascript">
            // Setup the Enforcement API
            function setupEnforcement(arkoseEnforcement) {
                var arkose = arkoseEnforcement.setConfig({
                    selector: '#enforce,

                    // We are using 'inline' as we want the session to be created as soon as the page loads
                    mode: "inline",

                    // These are the functions that can be called when the detection API is triggered
                    onCompleted: function(response) {
                        // When detection has been completed, send the response from the detection back to the native iOS code.
                        // The token from this data will then be used within the server-side verification API call to Arkose
                        window.ARKOSE.onCompleted(response.token);
                    },
                    onReady: function() {
                        window.ARKOSE.onReady("Done");
                    },
                    onReset: function() {
                        window.ARKOSE.onReset("Done");
                    },
                    onHide: function() {
                        window.ARKOSE.onHide("Done");
                    },
                    onSuppress: function() {
                        window.ARKOSE.onSuppress("Done");
                    },
                    onShow: function() {
                        window.ARKOSE.onShow("Done");
                    },
                    onShown: function() {
                        window.ARKOSE.onShown("Done");
                    },
                    onFailed: function(response) {
                        window.ARKOSE.onFailed("Done");
                    },
                    onError: function(response) {
                        window.ARKOSE.onError("Done");
                    },
                    onResize: function(response) {
                        window.ARKOSE.onResize("Done");
                    }
                });
            }
        </script>
    </head>
    <body>
        <!-- This is the element into which the enforcement challenge will be loaded -->
        <div id="enforce" style="width: 100%"></div>
    </body>
</html>
<html>
    <head>
        <meta name="viewport" content="width=device-width, initial-scale=1.0, maximum-scale=1, user-scalable=0"/>

        <!-- Setup the Arkose API -->
       <!--
    Include the Arkose Labs API in the <head> of your page. In the example below, remember to
    replace <company> with your company's personalized Client API URL name, and replace <YOUR_PUBLIC_KEY> with the public key supplied to you by Arkose Labs, and
    e.g. <script src="//client-api.arkoselabs.com/v2/<YOUR_PUBLIC_KEY>/api.js" data-callback="setupDetect" ></script>
  -->


        <script data-callback="setupDetect"
                src="https://<company>-api.arkoselabs.com/v2/<YOUR_PUBLIC_KEY>/api.js" ></script>

        <script type="text/javascript">
            // Setup the detection API
            function setupDetect(arkoseDetect) {
                var arkose = arkoseDetect.setConfig({
                    selector: '#detect,

                    // We are using 'inline' as we want the session to be created as soon as the page loads
                    mode: "inline",

                    // These are the functions that can be called when the detection API is triggered
                    onCompleted: function(response) {
                        // When detection has been completed, send the response from the detection back to the native iOS code.
                        // The token from this data will then be used within the server-side verification API call to Arkose
                        window.ARKOSE.onCompleted(response.token);
                    },
                    onReady: function() {
                        window.ARKOSE.onReady("Done");
                    },
                    onReset: function() {
                        window.ARKOSE.onReset("Done");
                    },
                    onHide: function() {
                        window.ARKOSE.onHide("Done");
                    },
                    onSuppress: function() {
                        window.ARKOSE.onSuppress("Done");
                    },
                    onShow: function() {
                        window.ARKOSE.onShow("Done");
},-
In the
mainActivity.javafile add the following changes to import the files needed to:a. Load the html file into the WebView.
b. Connect Java to JavaScript using a
JavascriptInterface.
import android.os.Bundle;
import android.view.View;
import android.webkit.WebView;
import android.webkit.JavascriptInterface;
import android.webkit.WebChromeClient;
import android.net.Uri;
import android.util.Log;
import android.widget.Button;- Generate a button and the WebView.
Button b1;
private WebView wv1;- Setup a
JavascriptInterfaceclass that can be used within the WebView JavaScript. The class should contain the functions to load the html file into the WebView and to Connect Java to JavaScript.
The examples shown below retrieve the Arkose Labs token and return it to the out log, and then hide the WebView after events happen on the JavaScript side. See the code example below appropriate to either our enforcement or detection components.
// Javascript interface used to processed messages send from the HTML file hosting the Arkose Labs API
    final class ArkoseJavaScriptInterface {

        @JavascriptInterface
        public void onCompleted(String response) {
            Log.i("onCompleted: ", response);
            // TODO: Pass response.token to your own server where the Arkose verify API can be called using your private key
        }

        @JavascriptInterface
        public void onReady() {
            Log.i("onReady");
        }

        @JavascriptInterface
        public void onReset() {
            Log.i("onReset");
        }

        @JavascriptInterface
        public void onHide() {
            Log.i("onHide");
        }

        @JavascriptInterface
        public void onSuppress() {
            Log.i("onSuppress");
        }

        @JavascriptInterface
        public void onShow() {
            Log.i("onShow");
        }

      	@JavascriptInterface
        public void onError(String response) {
            Log.i("onError: ", response);
        }

        @JavascriptInterface
        public void onFailed(String response) {
            Log.i("onFailed: ", response);
        }

      	@JavascriptInterface
        public void onResize(String response) {
            Log.i("onResize: ", response);
        }

        @JavascriptInterface
        public void onShown() {
            Log.i("onShown");
            runOnUiThread(new Runnable() {
                @Override
                public void run() {
                    webViewFrame.setVisibility(View.VISIBLE);
                }
            });
        }

        @JavascriptInterface
        public void setInvisible() {
            runOnUiThread(new Runnable() {
                @Override
                public void run() {
                    webViewFrame.setVisibility(View.INVISIBLE);
                }
            });
        }
    }
// Javascript interface used to processed messages send from the HTML file hosting the Arkose Labs API
final class ArkoseJavaScriptInterface {
@JavascriptInterface
public void onCompleted(String response) {
Log.i("onCompleted: ", response);
// TODO: Pass response.token to your own server where the Arkose verify API can be called using your private key
}
@JavascriptInterface
public void onReady() {
Log.i("onReady");
}
@JavascriptInterface
public void onHide() {
Log.i("onHide");
}
@JavascriptInterface
public void onSuppress() {
Log.i("onSuppress");
}
@JavascriptInterface
public void onShow() {
Log.i("onShow");
}
@JavascriptInterface
public void onError(String response) {
Log.i("onError: ", response);
}
@JavascriptInterface
public void onShow() {
Log.i("onShow");
runOnUiThread(new Runnable() {
@Override
public void run() {
webViewFrame.setVisibility(View.VISIBLE);
}
});
}
@JavascriptInterface
public void setInvisible() {
runOnUiThread(new Runnable() {
@Override
public void run() {
webViewFrame.setVisibility(View.INVISIBLE);
}
});
}
}- Add the button and the WebView into your
OnCreatemethod or equivalent.
@Override
    protected void onCreate(Bundle savedInstanceState) {
        super.onCreate(savedInstanceState);
        getSupportActionBar().hide();
        setContentView(R.layout.activity_main);

        // The web view and it's container will initially be invisible
        this.webViewFrame = findViewById(R.id.webViewFrame);
        webViewFrame.setVisibility(View.INVISIBLE);

        // Setup the web view
        this.webView = findViewById(R.id.webView);
        webView.setWebChromeClient(new WebChromeClient());
        webView.getSettings().setJavaScriptEnabled(true);
        webView.setOverScrollMode(View.OVER_SCROLL_NEVER);

        // Add a JavaScript interface to the web view that will be used to process messages
        // from the JavaScript callbacks in the Arkose API
        webView.addJavascriptInterface(new ArkoseJavaScriptInterface(), JS_ARKOSE_INTERFACE_NAME);

        // Stop the web View from being able to scroll it's content. This allows the web view to
        // be tighter against the iFrame without odd scrolling occurring
        webView.setOnTouchListener(new View.OnTouchListener() {
            public boolean onTouch(View v, MotionEvent event) {
                return (event.getAction() == MotionEvent.ACTION_MOVE);
            }
        });

        loginButton = findViewById(R.id.loginButton);
        loginButton.setOnClickListener(new View.OnClickListener() {
            @Override
            public void onClick(View v) {

                // Load the local HTML file that hosts the Arkose Labs API.
                String url = Uri.parse("file:///android_asset/ArkoseLabsAPI.html").toString();
                webView.loadUrl(url);
            }
        });
    }
The code example above sets up the button and an onClick event. When the button is clicked, the ArkoseLabsAPI.html file is loaded into the hidden WebView which is then made visible. The getSettings() function is used to allow images to be loaded automatically in the WebView for Arkose's enforcement component and to allow JavaScript to run. Once the challenge or detection loads and is solved or completed, the JavaScript callback event occurs which passes the Arkose Labs token back to Java and closes the WebView window. The token is then passed server side to be validated using the Arkose Labs server-side verification API.
Server-Side Instructions
When you have successfully set up your client-side set up you must go on to the Server-Side Setup Guide.
Updated 4 months ago