Client-Side Instructions
Enforcement Challenge UI 2.0See New Enforcement Challenge UI for details about our Enforce Challenge UI and what you need to do to prepare to use it.
Overview
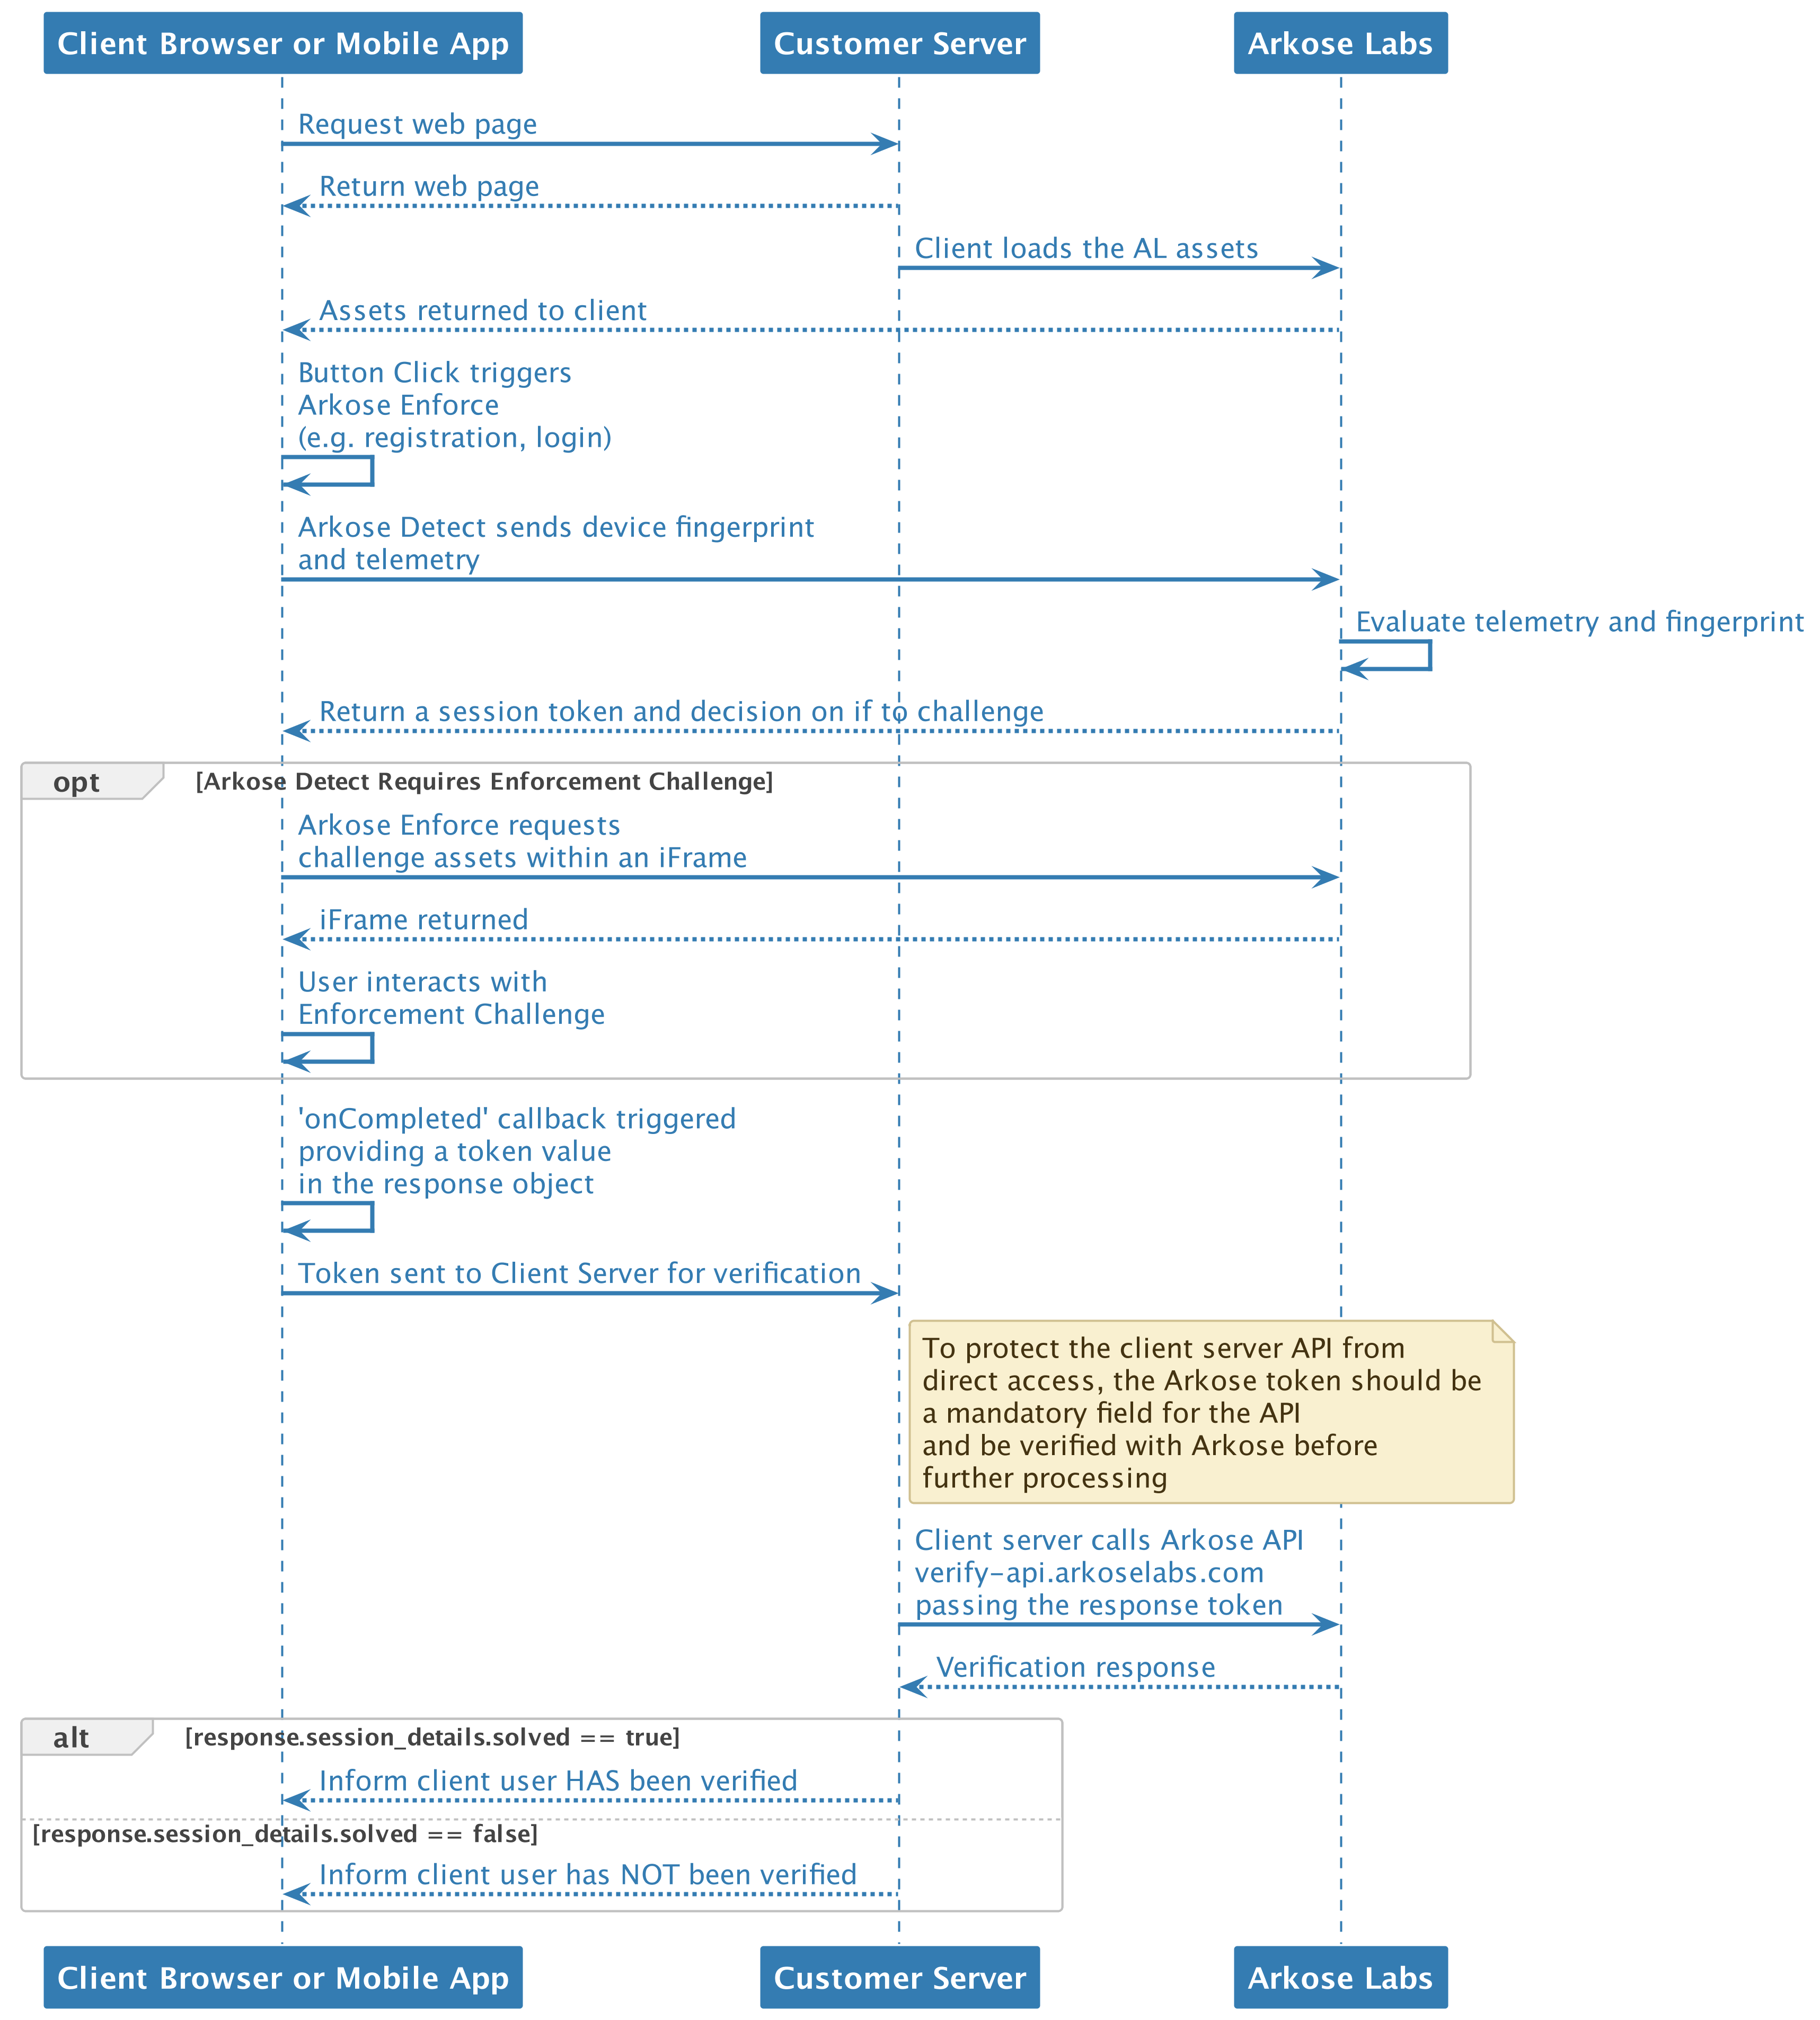
Fully implementing Arkose Bot Manager requires two steps:
-
Client-side implementation for Arkose Bot Manager to collect data needed to classify client traffic, display an Enforcement Challenge (EC) if applicable, and provide a one-time use token.
-
Server-side implementation that takes the client-side provided token and verifies it with the Arkose Labs Verify API. The response contains information about the session, either as a JSON object or in a simple format.
This page describes the required steps to implement client-side integration of Arkose Bot Manager, both for our detection and enforcement components. The detection component provides detection only capabilities with no visual enforcement while the enforcement component provides both detection and visual enforcements. There are additional instructions for iOS Mobile SDK and Android Mobile SDK.

API Request Authentication
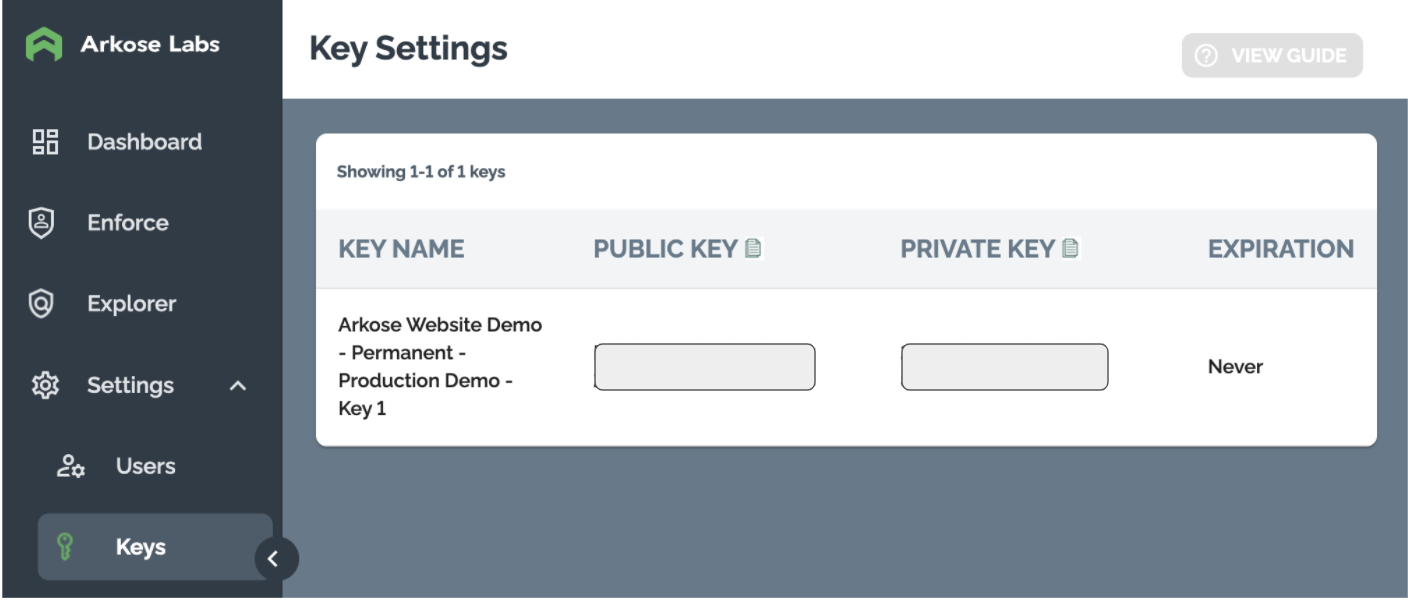
Arkose Labs authenticates your API requests using a private/public key pair that can be retrieved from the Key Settings page of the Arkose Labs Command Center. As shown below, go to the left menubar's Settings entry, and then to the Keys sub-entry. If you do not have access to the Command Center or do not have your private and public keys, contact your Sales Rep or Sales Engineer.

You use the private key to authenticate when using the Verify API. This private key must not be published on a client facing website, and must only be used on your Verify API's server-side implementation.
Client-Side Setup
When the client-side code is loaded in the webpage, Arkose Labs will read and store the website URL, including query string parameters. As is best practice, do not pass sensitive information into
GETrequest parameters. For passing sensitive information, make sure to usePOSTrequests, as is defined in the RFC 9110 document, HTTP Semantics.
To set up Arkose Bot Manager's client-side:
- For all pages you want to use Arkose Bot Manager, include the Arkose Bot Manager Client API (the API) with your public key, as shown in the below HTML code.
Only load the Arkose API script ONCE PER PAGELoading the Arkose API script multiple times on a single page causes duplicate event listeners and causes issues during implementation
- Define a global JavaScript function as shown below.
The comments have suggestions for where to put the code and how to use this code sample. Note that there are different code samples for our detection and enforcement components.
<html>
<head>
  <!--
    Include the Arkose Labs API in the <head> of your page. In the example below, remember to
    replace <company> with your company's personalized Client API URL name, and replace <YOUR PUBLIC KEY> with the public key supplied to you by Arkose Labs.
    e.g. <script src="//client-api.arkoselabs.com/v2/<YOUR PUBLIC KEY>/api.js" data-callback="setupEnforcement"></script>
  -->
  <script src="//<company>-api.arkoselabs.com/v2/<YOUR PUBLIC KEY>/api.js" data-callback="setupEnforcement"></script>
  <link rel="shortcut icon" href="#">
  <meta charset="UTF-8">
</head>
<body>
<!--
  The trigger element can exist anywhere in your page and can be added to the DOM at any time.
-->
<button id="enforcement-trigger">
  trigger element
</button>
<!--
  To configure the enforcement place a script tag just before the closing <body> tag and define the
  callback as a global function.
-->
<script>
  /*
    This global function will be invoked when the API is ready. Ensure the name is the same name
    that is defined on the attribute `data-callback` in the script tag that loads the api for your
    public key.
  */
  function setupEnforcement(myEnforcement) {
    myEnforcement.setConfig({
      selector: '#enforcement-trigger',
      onCompleted: function(response) {
        console.log(response.token);
      }
    });
  }
</script>
</body>
</html>
<html>
<head>
<!--
Include the Arkose Labs API in the <head> of your page. In the example below, remember to
replace the <YOUR PUBLIC KEY> with the public key supplied to you by Arkose Labs, and
replace <YOUR CALLBACK> with a name that refers to a global function.
e.g. <script src="//client-api.arkoselabs.com/v2/<YOUR PUBLIC KEY>/api.js" data-callback="setupDetect"></script>
-->
<script src="//<company>-api.arkoselabs.com/v2/<YOUR PUBLIC KEY>/api.js" data-callback="<YOUR CALLBACK>"></script>
<link rel="shortcut icon" href="#">
<meta charset="UTF-8">
</head>
<body>
<!--
The trigger element can exist anywhere in your page and can be added to the DOM at any time.
-->
<button id="detect-trigger">
trigger element
</button>
<!--
To configure the detection, place a script tag just before the closing <body> tag and define the
callback as a global function.
-->
<script>
/*
This global function will be invoked when the API is ready. Ensure the name is the same name
that is defined on the attribute `data-callback` in the script tag that loads the api for your
public key.
*/
function setupDetect(myDetect) {
myDetect.setConfig({
selector: '#detect-trigger',
onCompleted: function(response) {
console.log(response.token);
}
});
}
</script>
</body>
</html>Configuration Object
You configure Arkose Bot Manager by setting attribute values for the configuration object. This is done using the setConfig method on the Arkose object passed to the setup function. Please visit Configuration Object for more details.
Multi Key Setup
You can also utilize Arkose Labs Client API with two different Public Keys on the same page. This allows a single page to load and trigger multiple Enforcement challenges. One example of this is that different buttons can trigger different challenges on the same page.
The following example provides a simple HTML/JS page that utilizes the Client API with two different Public Keys.
<!DOCTYPE html>
<html>
<head>
	<title>Multi Keys Example</title>
	<meta charset="UTF-8" />
</head>
<body>
    <!--
    Remember to replace <YOUR PUBLIC KEY 1> and <YOUR PUBLIC KEY 2> with the public key supplied
    to you by Arkose Labs.
    -->
	<div>
		<p>Public Key: <YOUR PUBLIC KEY 1> </p>
		<button id="load1">Load JS</button>
		<button id="ec1" disabled>Open EC</button>
	</div>
	<div>
		<p>Public Key: <YOUR PUBLIC KEY 2> </p>
    <button id="load2">Load JS</button>
		<button id="ec2" disabled>Open EC</button>
	<div>
    <script>
      const loadJS = (key, callback) => {
        const currentScript = document.querySelector(`script[src*="${key}/api.js"]`)
        if (currentScript) {
          console.log('script already loaded');
          return;
        }

        <!--
    Remember to replace <company> with your company's personalized Client API URL name,
    and replace <YOUR PUBLIC KEY 1> and <YOUR PUBLIC KEY 2> with the public key supplied
    to you by Arkose Labs.
    e.g. <script src="//client-api.arkoselabs.com/v2/<YOUR PUBLIC KEY>/api.js" data-callback="setupEnforcement"></script>
  -->
        const script = document.createElement("script");
        script.type = "text/javascript";
        script.src = `https://<company>-api.arkoselabs.com/v2/${key}/api.js`;
        script.setAttribute("data-callback", callback);
        document.body.appendChild(script);
      }

      window.loadEc1 = (enforcement) => {
        enforcement.setConfig({
          selector: '#ec1',
          onReady: () => {
            document.getElementById("ec1").disabled = false;
          },
          onCompleted: (response) => {
            console.log(response.token);
          }
        });
      }

      window.loadEc2 = (enforcement) => {
        enforcement.setConfig({
          selector: '#ec2',
          onReady: () => {
            document.getElementById("ec2").disabled = false;
          },
          onCompleted: (response) => {
            console.log(response.token);
          }
        });
      }
      <!--
    Remember to replace <YOUR PUBLIC KEY 1> and <YOUR PUBLIC KEY 2> with the public key supplied
    to you by Arkose Labs.
    -->
      document.getElementById("load1").onclick = () => { loadJS("<YOUR PUBLIC KEY 1>", "loadEc1") }
      document.getElementById("load2").onclick = () => { loadJS("<YOUR PUBLIC KEY 2>", "loadEc2") }
    </script>
</body>

</html>
Post-Installation
Now that you've installed Arkose Bot Manager on a page, it will load the Arkose Bot Manager API script. When loaded, it creates a myArkose object that exposes public functions listed in the Client API myArkose-object and Client API myArkose-objectsections of these docs. Use these functions to support your specific implementation requirements.
You must ALWAYS call setConfig to set up the Client API and its callback functions. You need to define the callback functions to specify what happens when they are triggered at various points when running Arkose Bot Manager. See Client API for instructions for what to do next , what callbacks are called when during Arkose processing, and full information about the various objects and callbacks you need to use and/or define.
Do Not Send Sensitive Information Via GETOnce client-side code is deployed on the webpage, Arkose Labs can view all
GETrequest parameters. As is best practice, do not pass sensitive information intoGETrequest parameters. For passing sensitive information, usePOSTrequests, as is defined in the RFC 9110 HTTP Semantics document.
Inline Integration
This section is applicable for both our detection and enforcement components. However, the content about styling and positioning the Enforcement Challenge only applies to our enforcement component.
You can integrate the EC inline. This is primarily used for styling, positioning, and in general giving you more control over the integration presentation. If you are considering using inline mode, please consult with Arkose Labs first. There are cost implications associated with its use that you should be aware of before using it.
For full details, see the Inline Integration Guide (Arkose Labs Support login needed).
Example Implementations
These code examples show possible implementations of our enforcement component This section is not applicable to our detection component.
Session Invocation + Modal Overlay
The example below shows the following:
-
The Enforcement Challenge loaded as a semi-opaque modal screen.
-
The session is loaded and the appropriate challenge is displayed, depending on the key settings.
- If the key is set to transparent mode, or the session is classified as not requiring a challenge, the modal box is not shown.
In this example, form elements are locked out until the Arkose Labs API is ready. To make this sample complete, the response.token is output to an alert box. In production the response.token is sent back to your server for further inspection.
<head>
  <!--
    Include the Arkose Labs API in the <head> of your page. In the example below, remember to
    replace <company> with your company's personalized Client API URL name, and replace <YOUR PUBLIC KEY> with the public key supplied to you by Arkose Labs, and
    e.g. <script src="//client-api.arkoselabs.com/v2/<YOUR PUBLIC KEY>/api.js" data-callback="setupEnforcement"></script>
  -->
  <script type="text/javascript" data-callback="setupEnforcement" src="//<company>-api.arkoselabs.com/v2/<YOUR PUBLIC KEY>/api.js"></script>
  <script>
    function setupEnforcement(myEnforcement) {
      myEnforcement.setConfig({
        selector: '#submit-id',
        onCompleted: function(response) {
          alert(response.token);
        },
        onReady: function() {
          document.getElementById("submit-id").style.opacity = "1";
          document.getElementById("submit-id").disabled = false;
        }
      });
    }
  </script>
</head>
<body>
  <form method="post" target="_self">
    <input type="text">
    <input type="submit" id="submit-id" onclick="return false;" disabled=true, style="opacity:0.5;">
  </form>
</body>
Full Modal Overlay
This is only applicable to our enforcement component.
The example below shows the following:
-
The Enforcement Challenge loaded as a semi-opaque modal screen.
-
The session is loaded and the appropriate challenge is displayed, depending on the key settings.
-
If the key is set to passive mode, or the session was classified as not requiring a challenge, the modal box will disappear automatically after an imperceptible pause and will not be seen by the user.
In this example, Configuration Object parameters are manually set, and additional parameters can be passed if necessary.
To make this sample complete, the response.token is output to an alert box. In production, the response.token is sent back to your server for further inspection.
<head>
  <!--
    Include the Arkose Labs API in the <head> of your page. In the example below, remember to
    replace <company> with your company's personalized Client API URL name, and replace <YOUR PUBLIC KEY> with the public key supplied to you by Arkose Labs, and
    e.g. <script src="//client-api.arkoselabs.com/v2/<YOUR PUBLIC KEY>/api.js" data-callback="setupEnforcement"></script>
  -->
  <script type="text/javascript" data-callback="setupEnforcement" src="//<company>-api.arkoselabs.com/v2/<YOUR PUBLIC KEY>/api.js"></script>
  <script>
    function setupEnforcement(myEnforcement) {
      myEnforcement.setConfig({
        selector: '#submit-id',
        onCompleted: function(response) {
          console.log(response);
          alert(response.token);
        },
        onReady: function() {
          myEnforcement.run();
        }
      });
    }
  </script>
</head>
<body>
</body>
Updated 3 months ago