
Apple Mobile SDK
Introduction
Arkose Labs' mobile SDK lets you wrap our solution with Apple SDK native function calls. This guarantees seamless integration of your mobile apps with Arkose's full interactive challenges on detection and enforcement and does so without the extended wait times for separate mobile solutions.
This page covers the Mobile SDK for Apple devices. If you are developing in Android, see the Mobile SDK for Android page.
The Arkose Mobile SDK for Apple:
- Wraps Arkose's Advanced Enforcement Challenge in native “Web View”.
- Has 1-to-1 feature availability between web and mobile solutions.
- Integrates with your apps through native functions.
- Handles errors through callback events.
- Complies with Arkose Internal Security guidelines.
- Complies with Apple App Store guidelines for ease of integration.
- Is fully compatible with new API releases.
Mobile SDK High Level Design
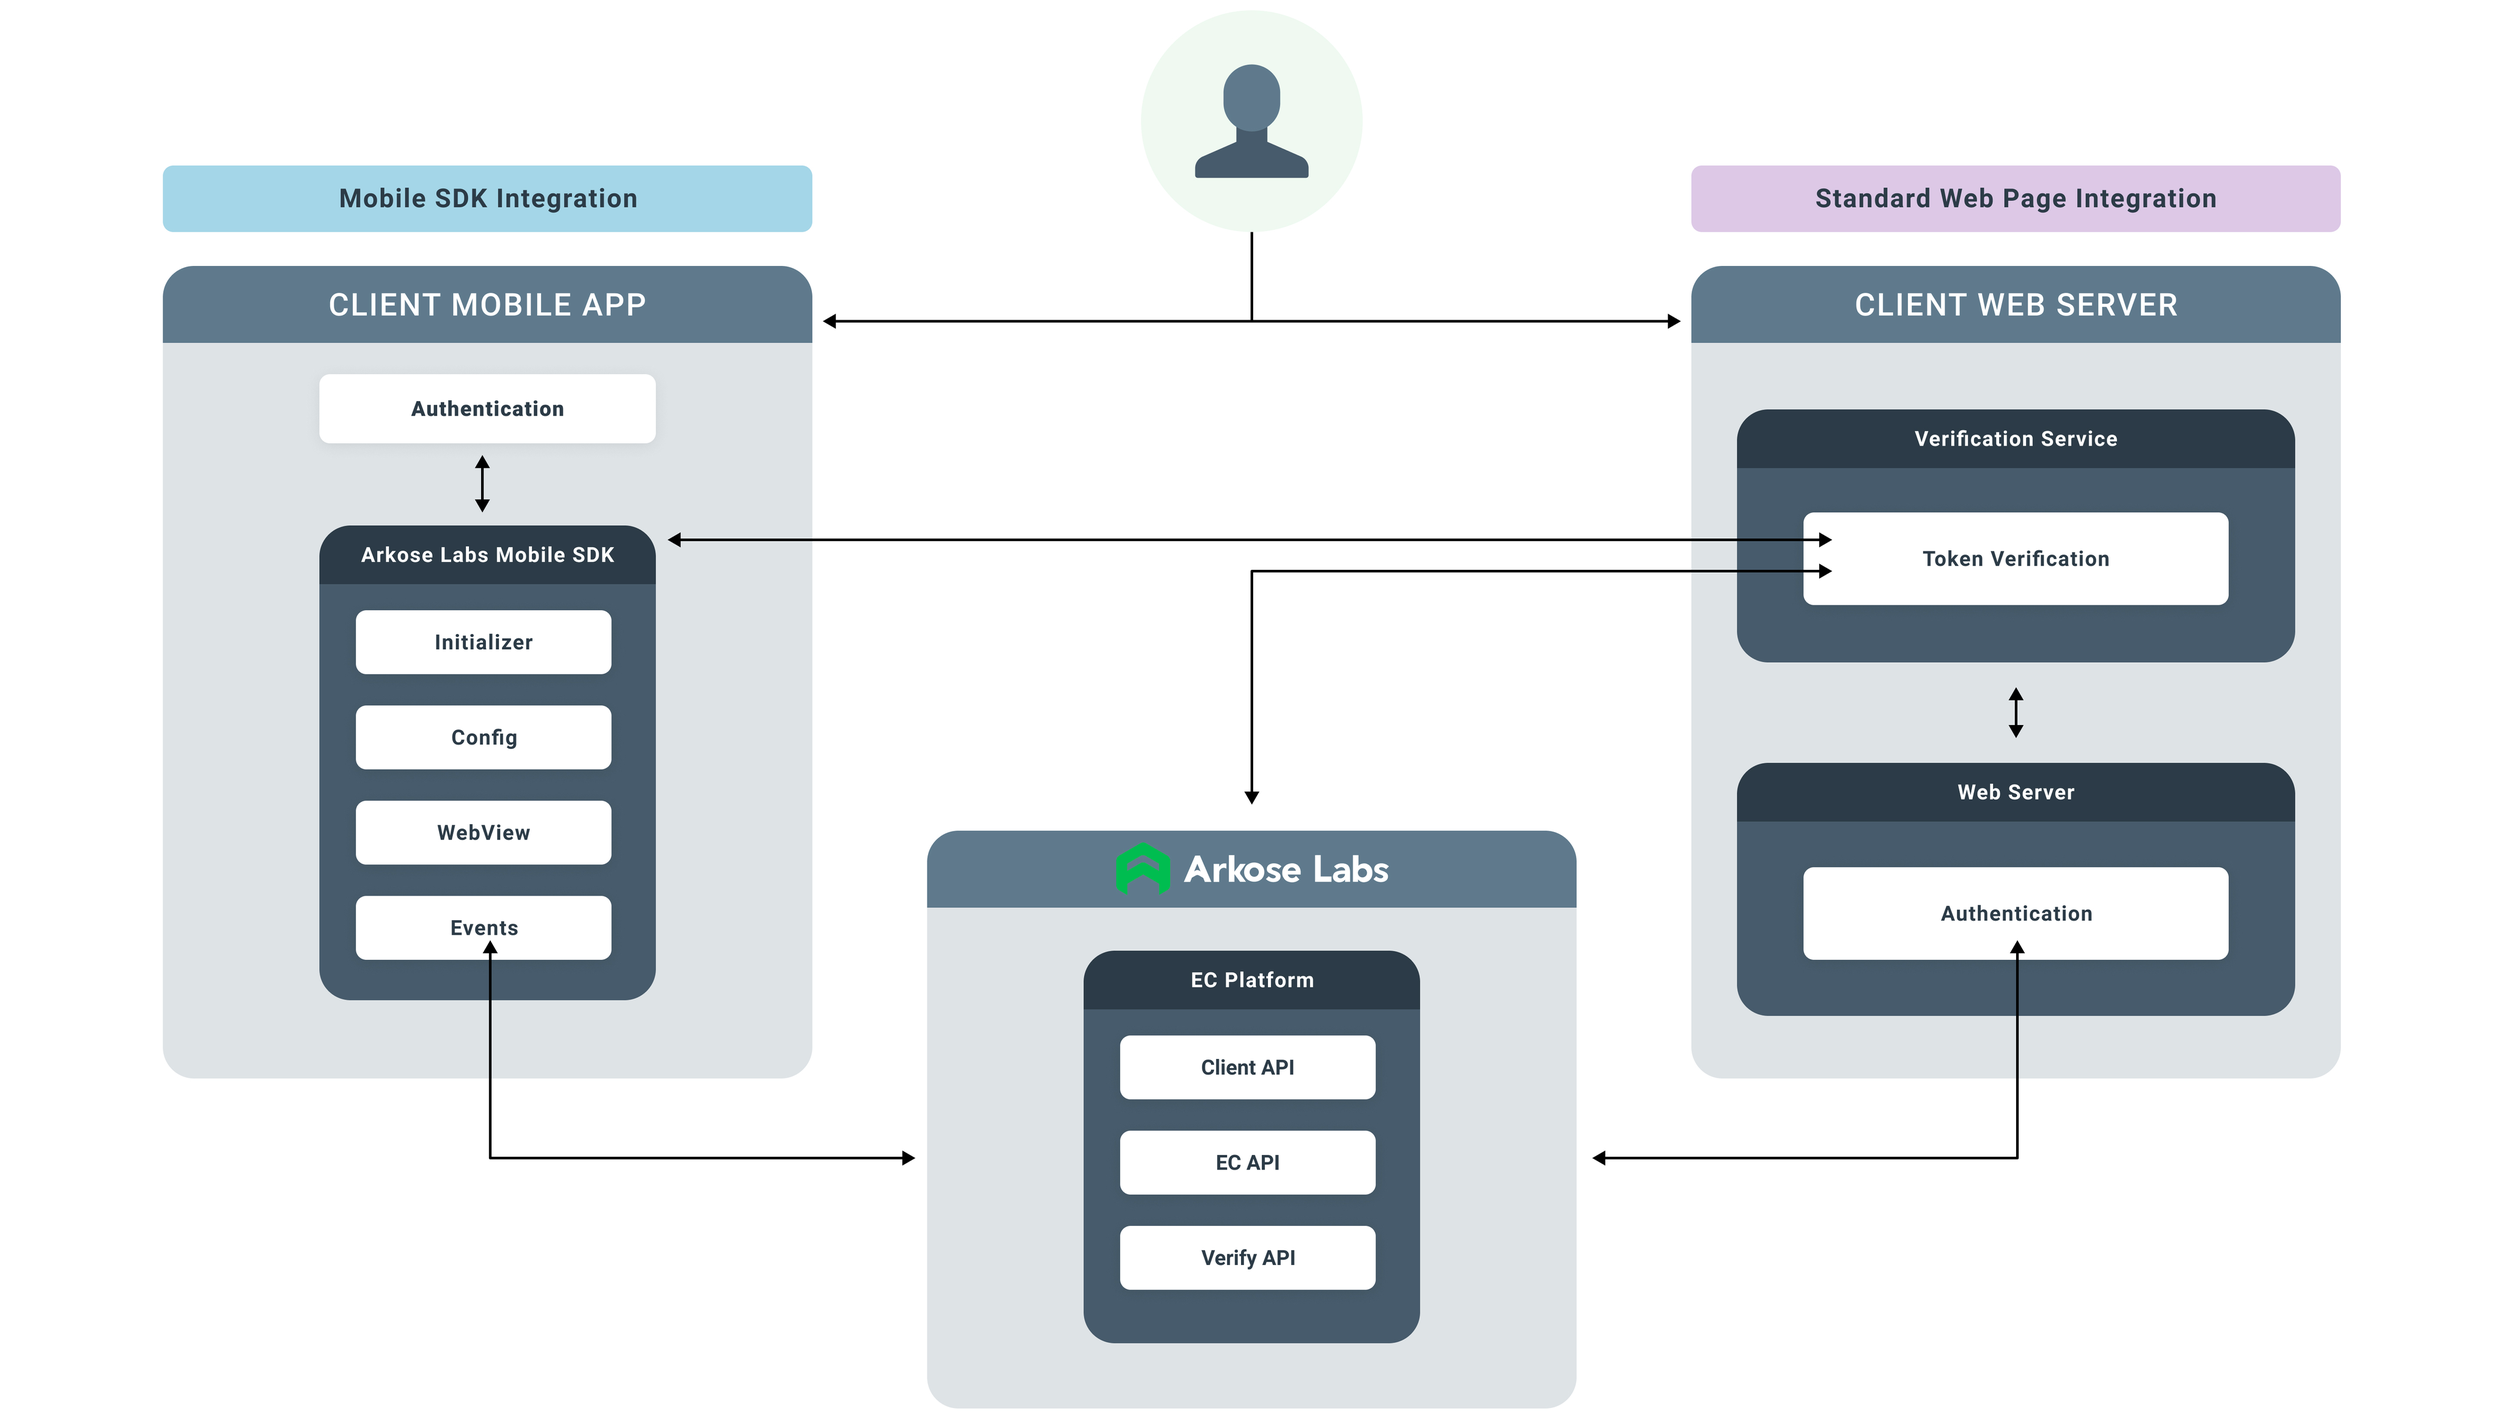
The high level design demonstrating Arkose Mobile SDK in Apple app.
Mobile SDK Builds Availability
The Arkose Labs Mobile SDKs are available via the Mobile SDK’s Support page. Please talk with your CSM (Customer Success Manager) about your intended usage and request access.
Compatibility
| Device | Minimum OS Version | Target OS Versions |
|---|---|---|
| iPhone | iOS 12+ | iOS 12, 13, 14, 15, 16, 17, 18 |
| iPad | iPadOS 12+ | iPadOS 12, 13, 14, 15, 16, 17, 18 |
| Mac | macOS 12+ | macOS 12, 13, 14, 15 |
| Vision OS | Vision OS 1.3+ | Vision OS 1.3, 2.0 |
All existing detection and challenge features on our web solution are also available on the Mobile SDKs. All new ones are automatically added; you don't need to update your application every time we have a new release of our Web platform.
Security
The Arkose Labs Mobile SDKs are Arkose Labs Security reviewed and comply with Apple App Store guidelines.
Performance
We created the Arkose Labs Mobile SDKs with stability and performance in mind. Their use has no significant impact on the host application’s performance.
Installation
Follow these steps to set up Arkose Labs Mobile SDK for iOS in Xcode in your host application. This applies to both our detection and enforcement components.
Prerequisites
- A host iOS application. You must be able to build and run this application.
- For the full end-to-end Arkose setup, you must also complete the standard Arkose Server-Side setup instructions.
Integration Steps
Upgrading from Arkose Apple SDK 2.x to 3.x?For a step-by-step upgrade from a v2.x version in a SwiftUI based apps, see the migration guide.
All existing UIKit integration flows (showEnforcementChallenge / ArkoseChallengeDelegate) are unchanged, there are no additional changes required to upgrade from the app side.
Include the package dependencies using the Swift Package Manager(SPM):
Prerequisites:
- You have received the Arkose provided credentials (username and token) from Arkose Command Center. Please visit How to Request a Mobile SDK Token for more information.
- If you are using a CI to build Apple applications, you will need to securely store these credentials in your CI environment.
Steps to add a SPM Package:
To integrate the SDK into your Apple project, follow these steps:
1. Add Credentials for Authenticated Access
To fetch the package via Xcode, you must use Arkose provided credentials:
- Open Keychain Access (macOS)
- Search for "http://github.com " in your Keychain.
- If an entry exists, ensure it is updated with Arkose provided
usernameandpersonal access token.
- Add the Credentials Manually (if not present):
- Go to Keychain Access > File > New Password Item.
- Set the following:
- Keychain Item Name:
github.com - Account Name: Arkose provided username
- Password: Arkose provided personal access token
- Keychain Item Name:
- Click Add button.
- Test the Credentials
- Clone the repository using Git:
git clone https://github.com/ArkoseLabs/alsdk-ios-packages.git- If successful, proceed to the next steps.Open Your Project in Xcode
- Open the
.xcodeprojor.xcworkspacefile of your project.
2. Navigate to Swift Packages
- In the Project Navigator, select your project.
- Go to Project Settings (click your project name in the left panel).
- Switch to the Package Dependencies tab.
3. Add the SDK as a Package Dependency
-
Click the + button in the lower-left corner of the Package Dependencies section.
-
In the popup dialog, enter the repository URL for the Swift package:
https://github.com/ArkoseLabs/alsdk-ios-packages
4. Authenticate with Credentials
- After entering the URL, a dialog will appear prompting you for credentials.
- Input the credentials provided by Arkose to proceed.
Ensure these credentials are stored securely and not shared outside authorized usage.
5. Select the Package Version
- Choose the versioning rule for the package. Select Exact Version and input the version name of latest Arkose Apple SDK version.
- Click Next to continue.
6. Add the Package to Your Target
- Xcode will fetch the package. Once the process completes, select the target(s) where you want to use the package.
- Click Finish to complete the integration.
Legacy Dependency Support using xcframework or static libraryRefer to these instructions.
Arkose Apple SDK integration in UIKit based appsRefer to these instructions.
Arkose Apple SDK integration in SwiftUI based apps
To integrate Arkose Bot Manager solution with the Enforcement Challenge, follow the steps outlined below:
- Import
ArkoseLabsKitorArkoseLabsKitStaticmodule before invoking any API from the SDK:
// For dynamic framework
import ArkoseLabsKit

// For static framework
//import ArkoseLabsKitStatic- Initialize the SDK as soon as the application launches with
ArkoseConfigobject that contains all configuration parameters. We recommend usingUIApplicationDelegatedidFinishLaunchingWithOptionsnotification to do the initialization, on the main thread. PasswithPrewarm: true(recommended) so the SDK creates the shared web view and prepares the challenge ahead of time, before the user reaches the screen; this improves user-perceived latency. A sample initialization code is shown below:
ArkoseManager.initialize(
    with: ArkoseConfig.Builder(withAPIKey: <YOUR_PUBLIC_KEY>)
            .with(apiBaseUrl: "https://client-api.arkoselabs.com/v2") // optional; this is the default. Replace with your vanity URL if Arkose Labs provided one.
            .build(),
    withPrewarm: true
    )
A complete example of didFinishLaunchingWithOptions implementation is below:
// For dynamic framework
import ArkoseLabsKit

// For static framework
//import ArkoseLabsKitStatic
import SwiftUI

class AppDelegate: NSObject, UIApplicationDelegate {
    func application(_ application: UIApplication, didFinishLaunchingWithOptions launchOptions: [UIApplication.LaunchOptionsKey : Any]? = nil) -> Bool {
        ArkoseManager.initialize(
            with: ArkoseConfig.Builder(withAPIKey: <YOUR_PUBLIC_KEY>)
                    .with(apiBaseUrl: "https://client-api.arkoselabs.com/v2") // default; replace with your vanity URL if Arkose Labs provided one
                    .with(language: "en") //optional
                    .with(clientAPIRetryCount: 0) //optional
                    .with(styleTheme: "") //optional
                    .build(),
            withPrewarm: true
            )
        return true
    }
}
Note: withPrewarm defaults to false. When false, preparation happens the first time an ArkoseView appears; passing true prepares it at launch.
Integrate the Enforcement Challenge
Use
ArkoseViewto run Arkose Bot Manager and display the Enforcement Challenge in SwiftUI.ArkoseViewis the recommended SwiftUI component and is available on iOS, macOS, and visionOS under the same type name.Deprecation notice
ArkoseChallengeView(iOS) andChallengeView(macOS/visionOS) are deprecated as of v3.0.0. They remain fully supported and available for use, so you can migrate at your own pace. New SwiftUI integrations should useArkoseView. To move an existing screen fromArkoseChallengeViewtoArkoseView, follow the migration guide. Full documentation for existingArkoseChallengeViewintegrations - including preloading and programmatic dismissal - is on the SwiftUI integration withArkoseChallengeView(deprecated) page.
Place ArkoseView in your layout and drive it with a startEC binding. Set startEC = true to run the Enforcement Challenge, and handle the result in onChallengeCallback. You do not need to reset startEC yourself - the SDK clears it on terminal events.
ArkoseView(startEC: $startEC)
                .onChallengeCallback { event in
                    switch event.type {
                    case .onCompleted:
                        // event.response["token"] is the verification token.
                        // Send it to your backend for server-side verification.
                        // The SDK resets startEC for you on this terminal event.
                        break
                    default:
                        break
                    }
                }
See the full walkthrough in Integrate using ArkoseView below, and Appendix: Complete ArkoseView example for a complete implementation.
Receiving Notification
ArkoseView delivers every event through a single .onChallengeCallback modifier - see Receiving callbacks below. The most commonly handled events are onCompleted, onError, and onFailed.
If you are using the deprecated ArkoseChallengeView, implement the ArkoseChallengeDelegate protocol on the SwiftUI View instead and pass the instance as the delegate parameter. To simplify the implementation, ArkoseChallengeDelegate has a default implementation, so implement only the necessary methods for your desired functionality. (For UIKit applications, see Arkose Apple SDK integration in UIKit based apps.)
Build the revised project
- Perform a Clean.
- Perform a Build.
Run and test the application
- Run your modified iOS application.
- When running Arkose Bot Manager:
- On the integrated screen, confirm you now see an Arkose Enforcement Challenge.
- Verify the challenge.
- On successful verification, the
onCompletedevent returns atokenas part of the response JSON object. - Send the
tokento your back-end server for verification.
Update Configuration in SDK
To update configuration of the SDK any time before Enforcement Challenge is called, pass a config directly to ArkoseView in the content of your custom view:
ArkoseView( startEC: $startEC,
            config: ArkoseConfig.Builder(withAPIKey: <YOUR_PUBLIC_KEY>)
                                    .with(apiBaseUrl: "https://client-api.arkoselabs.com/v2") // default; replace with your vanity URL if Arkose Labs provided one
                                    .with(language: "en") //optional
                                    .with(clientAPIRetryCount: 0) //optional
                                    .with(styleTheme: "") //optional
.build())A config passed to
ArkoseView, likeArkoseManager.update(with:), replaces the active configuration in full for that view. Any parameter you leave out reverts to its default, includingapiBaseUrl, which falls back tohttps://client-api.arkoselabs.com/v2. If you use a vanity URL, setapiBaseUrlon everyArkoseConfigyou build, including the one you pass to theonPrepareForResetCallbackcompletion.
See Appendix: Complete ArkoseView example below for a complete example.
For UIKit applications, see Update Configuration on the UIKit integration page.
Integrate using ArkoseView
ArkoseViewArkoseView is a SwiftUI component for displaying the Enforcement Challenge either inline in your layout or inside your own modal (.sheet / .fullScreenCover). It gives your app full control over where and how the challenge is presented - ArkoseView never presents a modal itself.
- Availability: Apple SDK v3.0.0 and above.
- Minimum OS (runtime): iOS 13.0 · macOS 12.0 · visionOS 1.3. The SDK's package deployment targets are unchanged (iOS 12 / macOS 12 / visionOS 1.0).
- One type across platforms:
ArkoseViewreplaces bothArkoseChallengeView(iOS) andChallengeView(macOS/visionOS). - Sample apps: working integrations live in
Sample Apps/SwiftUIApp(iOS),Sample Apps/SwiftUIVision(visionOS), andSample Apps/SwiftUIAppMacOS(macOS).
Prerequisites
Import the module and initialize the SDK with withPrewarm: true, as shown in Integration Steps above. With pre-warming, preload-then-run is the default behaviour - the challenge is prepared ahead of time and only runs when you set startEC. You do not need to set inlineRunOnTrigger.
You can also pass configuration directly to ArkoseView(config:) instead of initialize(with:) - see the API reference.
Optional - observe the pre-warm outcome (iOS 13+). A callback overload of initialize(...) reports whether pre-warming succeeded, so you can react before the user reaches the screen:
ArkoseManager.initialize(with: config, withPrewarm: true) { event in
    switch event.type {
    case .onReady:
        // Pre-warm succeeded - the challenge is ready.
        break
    case .onError:
        // Pre-warm failed after retries were exhausted; event.response carries the error.
        break
    default:
        break
    }
}
This callback is a one-shot pre-warm observer invoked on the main thread - it fires exactly once (a single
.onReadyon success, or a single.onErrorafter retries are exhausted) and is then discarded. A laterinitialize(...)replaces it and fires once again. Re-initializing with a changed config (for example, a corrected base URL after a failed pre-warm) re-warms with the new configuration; re-initializing with an unchanged config while already warm is a no-op. This overload requires iOS 13 / macOS 12 / visionOS 1.3+; the callback-lessinitialize(with:withPrewarm:)preserves the iOS 12 floor.
Controlling the challenge
startEC- set totrueto start the Enforcement Challenge. The SDK automatically setsstartECback tofalseon terminal events (onCompleted,onError,onHide, non-recoverableonFailed, andonForceDismissCompleted), so you do not need to reset it yourself. Setting it tofalseyourself while a challenge is running ends the challenge, and is good practice for keeping your view state explicit. Handle the outcome inonChallengeCallback.resetEC(optional) - set totrueto reset the current challenge. It applies only while a challenge is running. LikestartEC, it is a one-shot binding: the SDK sets it back tofalseafter handling it (including when it is ignored because no challenge is active), so you don't need to clear it yourself.
Receiving callbacks - onChallengeCallback
onChallengeCallbackAttach .onChallengeCallback { event in … } to receive every callback through a single closure. Each event carries a type and a response dictionary.
Always include a
default(or@unknown default) branch: new callback types may be added in future SDK releases.
event.type | When it fires |
|---|---|
.onReady | The challenge/detection is ready. |
.onShow | Enforcement is running or re-displayed. |
.onShown | The Enforcement Challenge is displayed for the first time. |
.onSuppress | The session was classified as not requiring a challenge (transparent). |
.onHide | The challenge/detection view was hidden (completed or cancelled or superseded by a newer ArkoseView). |
.onReset | The challenge was reset. |
.onCompleted | Completed or not needed - event.response contains the verification token. |
.onError | An error occurred loading the challenge/detection. |
.onFailed | The user failed the challenge - check event.response["recoverable"]. |
.onWarning | A non-fatal issue to surface to the app. |
.onResize | The challenge container size changed. |
.onForceDismissCompleted | A dismissal completed. |
Response payloads
event.response mirrors the CAPI Response Object - the SDK passes it through unchanged, so the authoritative schema is the Arkose CAPI Response Object reference. The fields you'll use most:
| Event | event.response field(s) |
|---|---|
.onCompleted | token - the session verification token. Send it to your backend to verify server-side; never trust the client alone. |
.onFailed | recoverable (Bool) - true: keep the challenge so the user can retry; false or absent: safe to dismiss. |
.onResize | width, height - the challenge's new size. |
Preparing before a reset - onPrepareForResetCallback
onPrepareForResetCallbackWhen the user taps Reset (or you trigger resetEC), you can optionally prepare before the reset runs - for example, fetch a fresh blob or change the configuration - via a dedicated modifier, separate from onChallengeCallback. Call the supplied completion (synchronously or later) to let the reset proceed.
ArkoseView(startEC: $startEC, resetEC: $resetEC)
    .onChallengeCallback { event in /* … */ }
    .onPrepareForResetCallback { completion in
        // Do any setup needed for this reset - e.g. get a new APISV token or DX blob.
        // Then call completion when done (this can be async).
        //
        // The completion takes an optional ArkoseConfig:
        //   - pass a config to re-initialize this reset with it (e.g. a language/blob change)
        //   - pass nil to keep the current configuration.
        completion(updatedConfig)   // or: completion(nil)
    }
This hook is opt-in and invoked on the main thread. With no
onPrepareForResetCallbackregistered, resets proceed automatically (the default). ObservingonChallengeCallbackdoes not implicitly gate resets. To change configuration for this reset, pass anArkoseConfigto the completion (completion(updatedConfig)), or passnilto keep the current configuration. The change takes effect on that same reset, not the next one. The completion may be called off the main thread - the SDK applies the config on the main thread before running the reset. You must call the completion closure, or the challenge will not reset.
Choosing the presentation
ArkoseView is inline by default. To present it modally, wrap it in your own SwiftUI container and bind the cover/sheet to the same startEC:
// Inline - renders within the current layout
ArkoseView(startEC: $startEC).onChallengeCallback { /* … */ }

// Modal - bind the cover/sheet to the SAME startEC
.fullScreenCover(isPresented: $startEC) {
    ArkoseView(startEC: $startEC)
        .onChallengeCallback { event in
            switch event.type {
            case .onCompleted:
                // use event.response["token"]
                break
            default:
                break
            }
        }
}
Because the SDK sets startEC = false on terminal events, the cover/sheet is dismissed automatically when the challenge ends - no separate presentation binding is needed. The same pattern works with .sheet(isPresented: $startEC).
Programmatic dismissal is host-controlled: set startEC = false to end the challenge (this also dismisses a .fullScreenCover / .sheet bound to startEC). Because the app owns presentation, no separate forceDismiss API is required for ArkoseView.
Multiple ArkoseViews and session supersession
When a different ArkoseView starts enforcement while another's challenge is live, the SDK supersedes the live session. The superseded view gets onHide with response["dismissReason"] == "superseded" (and, being terminal, its startEC auto-resets to false).
Optional: In-SDK Cancel / Reset buttons
Pass cancelActionConfig / resetActionConfig to show an in-SDK action bar. If either is nil (the default), that button is hidden.
ArkoseView(
    startEC: $startEC,
    resetEC: $resetEC,
    cancelActionConfig: ArkoseActionConfig(title: "Cancel"),
    resetActionConfig: ArkoseActionConfig(title: "Reset")
)
.onChallengeCallback { event in /* … */ }
Layout and sizing
ArkoseView sizes itself to the challenge. Width is bounded to the space your layout gives it; height is content-driven. How you place it decides the result:
- No
.frame(self-sizing). The challenge takes the width available in your layout and whatever height it needs. On a short screen (for example, landscape) it keeps its full height and scrolls within your scroll view instead of being squeezed or clipped. Provide a scroll view so a tall challenge can scroll when the available height is limited.
   ScrollView {
       ArkoseView(startEC: $startEC)
           .onChallengeCallback { /* … */ }
   }
   // → the challenge renders at its natural size; it scrolls when it is taller
// than the available height (e.g. landscape).- With
.frame(...). The challenge is bounded by the frame you set.- A frame smaller than the challenge clamps the challenge to that size and clips the overflow.
- A frame larger than the challenge is not stretched - the challenge keeps its natural size.
   ArkoseView(startEC: $startEC)
       .onChallengeCallback { /* … */ }
       .frame(width: 300, height: 400)   // clamped to 300×400; overflow is clipped
The layout also adapts automatically to orientation changes (device rotation / iPad window resize).
Releasing resources
Call ArkoseManager.deinitialize() to free the resources used by pre-warming when Arkose won't be needed for a while. You must call initialize(with:withPrewarm:) again before presenting another challenge.
Programmatic Dismissal of Enforcement Challenge
Programmatic dismissal allows you to programmatically close an active Enforcement Challenge without user interaction.
This is useful in scenarios such as:
- Handling app lifecycle events (e.g., app going to background)
- Implementing timeout mechanisms
- Responding to external events that require immediate challenge dismissal
ArkoseView: dismissal is host-controlled - set startEC = false to end the challenge. This also dismisses a .fullScreenCover / .sheet bound to startEC. See Choosing the presentation above; no separate dismissal API is required.
UIKit applications: use ArkoseManager.forceDismissEnforcementChallenge() - see Programmatic Dismissal on the UIKit integration page.
Legacy ArkoseChallengeView: dismissal is handled through the isPresented binding - see Programmatic Dismissal on the ArkoseChallengeView page.
API Reference
This section documents the SwiftUI ArkoseView API, available from v3.0.0. The types shared by every integration path - ArkoseManager, ArkoseConfig and ArkoseConfig.Builder, ArkoseActionConfig, ArkoseChallengeDelegate, and LogLevel - are documented in the Apple SDK Common API Reference, so SwiftUI and UIKit applications share a single reference. For SDK versions below v2.1.0, see the Legacy API Reference.
ArkoseView
ArkoseView is a SwiftUI View for inline Enforcement Challenge presentation on iOS, macOS, and visionOS.
@available(iOS 13.0, macOS 12.0, visionOS 1.3, *)
public init(
    startEC: Binding<Bool>,
    resetEC: Binding<Bool>? = nil,
    config: ArkoseConfig? = nil,
    cancelActionConfig: ArkoseActionConfig? = nil,
    resetActionConfig: ArkoseActionConfig? = nil,
    withActivity: Bool? = nil
)- startEC:
Binding<Bool>. Set totrueto run enforcement; set tofalseto end the current challenge. The SDK resets it tofalseon terminal events. - resetEC:
Binding<Bool>?. Set totrueto reset the active challenge. One-shot - the SDK clears it back tofalse. Applies only while a challenge is running. Defaultnil. - config:
ArkoseConfig?. Configuration for this view; whennil, the configuration supplied toArkoseManager.initialize(with:)is used. When set, it is used in full for this view (it does not merge with the initialize configuration), so includeapiBaseUrlif you use a vanity URL. Defaultnil. - cancelActionConfig:
ArkoseActionConfig?. Shows an in-SDK Cancel button when set. Defaultnil(hidden). - resetActionConfig:
ArkoseActionConfig?. Shows an in-SDK Reset button when set. Defaultnil(hidden). - withActivity:
Bool?.nil/trueshows the loading indicator while the challenge is preparing;falsekeeps the container transparent. Defaultnil(treated astrue).
onChallengeCallback(_:)
onChallengeCallback(_:)public func onChallengeCallback(_ action: @escaping (ArkoseChallengeCallbackEvent) -> Void) -> SelfRegisters a handler that receives every callback as a single ArkoseChallengeCallbackEvent. The handler is invoked on the main thread.
onPrepareForResetCallback(_:)
onPrepareForResetCallback(_:)public func onPrepareForResetCallback(_ action: @escaping (@escaping (ArkoseConfig?) -> Void) -> Void) -> SelfRegisters an optional handler invoked just before a reset, on the main thread. The handler receives a completion closure to call - synchronously or asynchronously - once preparation is done; the reset proceeds when it is called. Pass an ArkoseConfig to apply that configuration to the same reset, or nil to reset with the existing configuration. With no handler registered, resets proceed automatically.
ArkoseChallengeCallbackEvent
public struct ArkoseChallengeCallbackEvent {
    public let type: ArkoseChallengeCallbackType
    public let response: [String: Any?]
}
ArkoseChallengeCallbackType
public enum ArkoseChallengeCallbackType: String {
    case onReady, onShow, onShown, onSuppress, onHide, onReset
    case onCompleted, onError, onFailed, onWarning, onResize, onForceDismissCompleted
}
ArkoseChallengeView (deprecated)
Deprecated in v3.0.0.
ArkoseChallengeViewremains fully supported and available, but new SwiftUI integrations should useArkoseView. Its full reference and integration guide are on the SwiftUI integration withArkoseChallengeView(deprecated) page. To migrate, see the migration guide.
Legacy API Reference (below v2.1.0)
Documentation for SDK versions below v2.1.0 (v2.0.1 and v1.0) has moved to the Apple SDK Legacy API Reference.
Appendix: Complete ArkoseView example
ArkoseView exampleimport SwiftUI
import ArkoseLabsKit
struct ContentView: View {
@State private var startEC = false
@State private var resetEC = false
var body: some View {
ScrollView {
VStack(spacing: 16) {
Button("Start Enforcement") { startEC = true }
ArkoseView(
startEC: $startEC,
resetEC: $resetEC,
cancelActionConfig: ArkoseActionConfig(title: "Cancel"),
resetActionConfig: ArkoseActionConfig(title: "Reset")
)
.onChallengeCallback { event in
switch event.type {
case .onReady: print("Ready")
case .onShown: print("Shown")
case .onCompleted:
// Send event.response["token"] to your backend for server-side verification.
print("Token: \(event.response["token"] ?? "")")
startEC = false // optional - the SDK also clears it on terminal events
case .onError, .onHide: startEC = false
case .onFailed:
let recoverable = (event.response["recoverable"] as? Bool) ?? false
if !recoverable { startEC = false }
default: break
}
}
.onPrepareForResetCallback { completion in
// Optional: prepare (e.g. change config) before the reset, then continue.
completion()
}
}
.padding()
}
}
}
// App launch (main thread)
class AppDelegate: NSObject, UIApplicationDelegate {
func application(_ application: UIApplication,
didFinishLaunchingWithOptions launchOptions: [UIApplication.LaunchOptionsKey: Any]? = nil) -> Bool {
ArkoseManager.initialize(
with: ArkoseConfig.Builder(withAPIKey: "YOUR_API_KEY").build(),
withPrewarm: true
)
return true
}
}Appendix: Modal presentation (popup) with .fullScreenCover
.fullScreenCoverBind the cover to the same startEC. Setting startEC = true presents the cover and runs the challenge; the SDK sets startEC = false on a terminal event, which dismisses the cover automatically - no separate presentation binding and no manual reset required.
import SwiftUI
import ArkoseLabsKit

struct LoginView: View {
    @State private var startEC = false

    var body: some View {
        Button("Login") { startEC = true }
            .fullScreenCover(isPresented: $startEC) {
                ArkoseView(startEC: $startEC)
                    .onChallengeCallback { event in
                        switch event.type {
                        case .onCompleted:
                            // event.response["token"] is the verification token - send it to your backend.
                            // The SDK sets startEC = false, which dismisses the cover.
                            break
                        case .onFailed:
                            let recoverable = (event.response["recoverable"] as? Bool) ?? false
                            // When non-recoverable, the SDK ends the challenge and dismisses the cover.
                            // When recoverable, the challenge stays up so the user can retry.
                            _ = recoverable
                        default:
                            break
                        }
                    }
            }
    }
}
The same pattern works with
.sheet(isPresented: $startEC). If you need to dim the app behind a cover, make the cover transparent with.presentationBackground(.clear)(iOS 16.4+) and place a dim layer (for exampleColor.black.opacity(0.8).ignoresSafeArea()) inside the cover, above your content and belowArkoseView. Verify the backdrop on-device before shipping.
Updated 10 days ago