React Native Mobile SDK
Introduction
The React Native ArkoseLabs SDK lets you integrate Arkose Labs' bot mitigation and fraud prevention solution into your React Native apps using native function calls for Android and iOS. This guarantees seamless integration with Arkose's full interactive challenges for detection and enforcement, without the extended wait times for separate mobile solutions.
This page covers the Mobile SDK for React Native. If you are developing for Android or iOS natively, see the Mobile SDK for Android page and Mobile SDK for iOS page.
Arkose Mobile SDK for React Native:
- Wraps Arkose's Advanced Enforcement Challenge in native Android/iOS "web views".
- Ensures 1-to-1 feature availability between the native Android/iOS SDKs and the React Native SDK.
- Integrates with your apps through a React Native Bridge.
- Handles errors and challenge interactions through callback events.
- Complies with Arkose Internal Security guidelines.
- Complies with Google Play Store and Apple App Store guidelines for seamless integration.
- Is fully compatible with new Enforcement Challenge-API (EC-API) releases.
- Supports minimum Android OS version 5.0 and iOS version 12.0.
Mobile SDK High Level Design
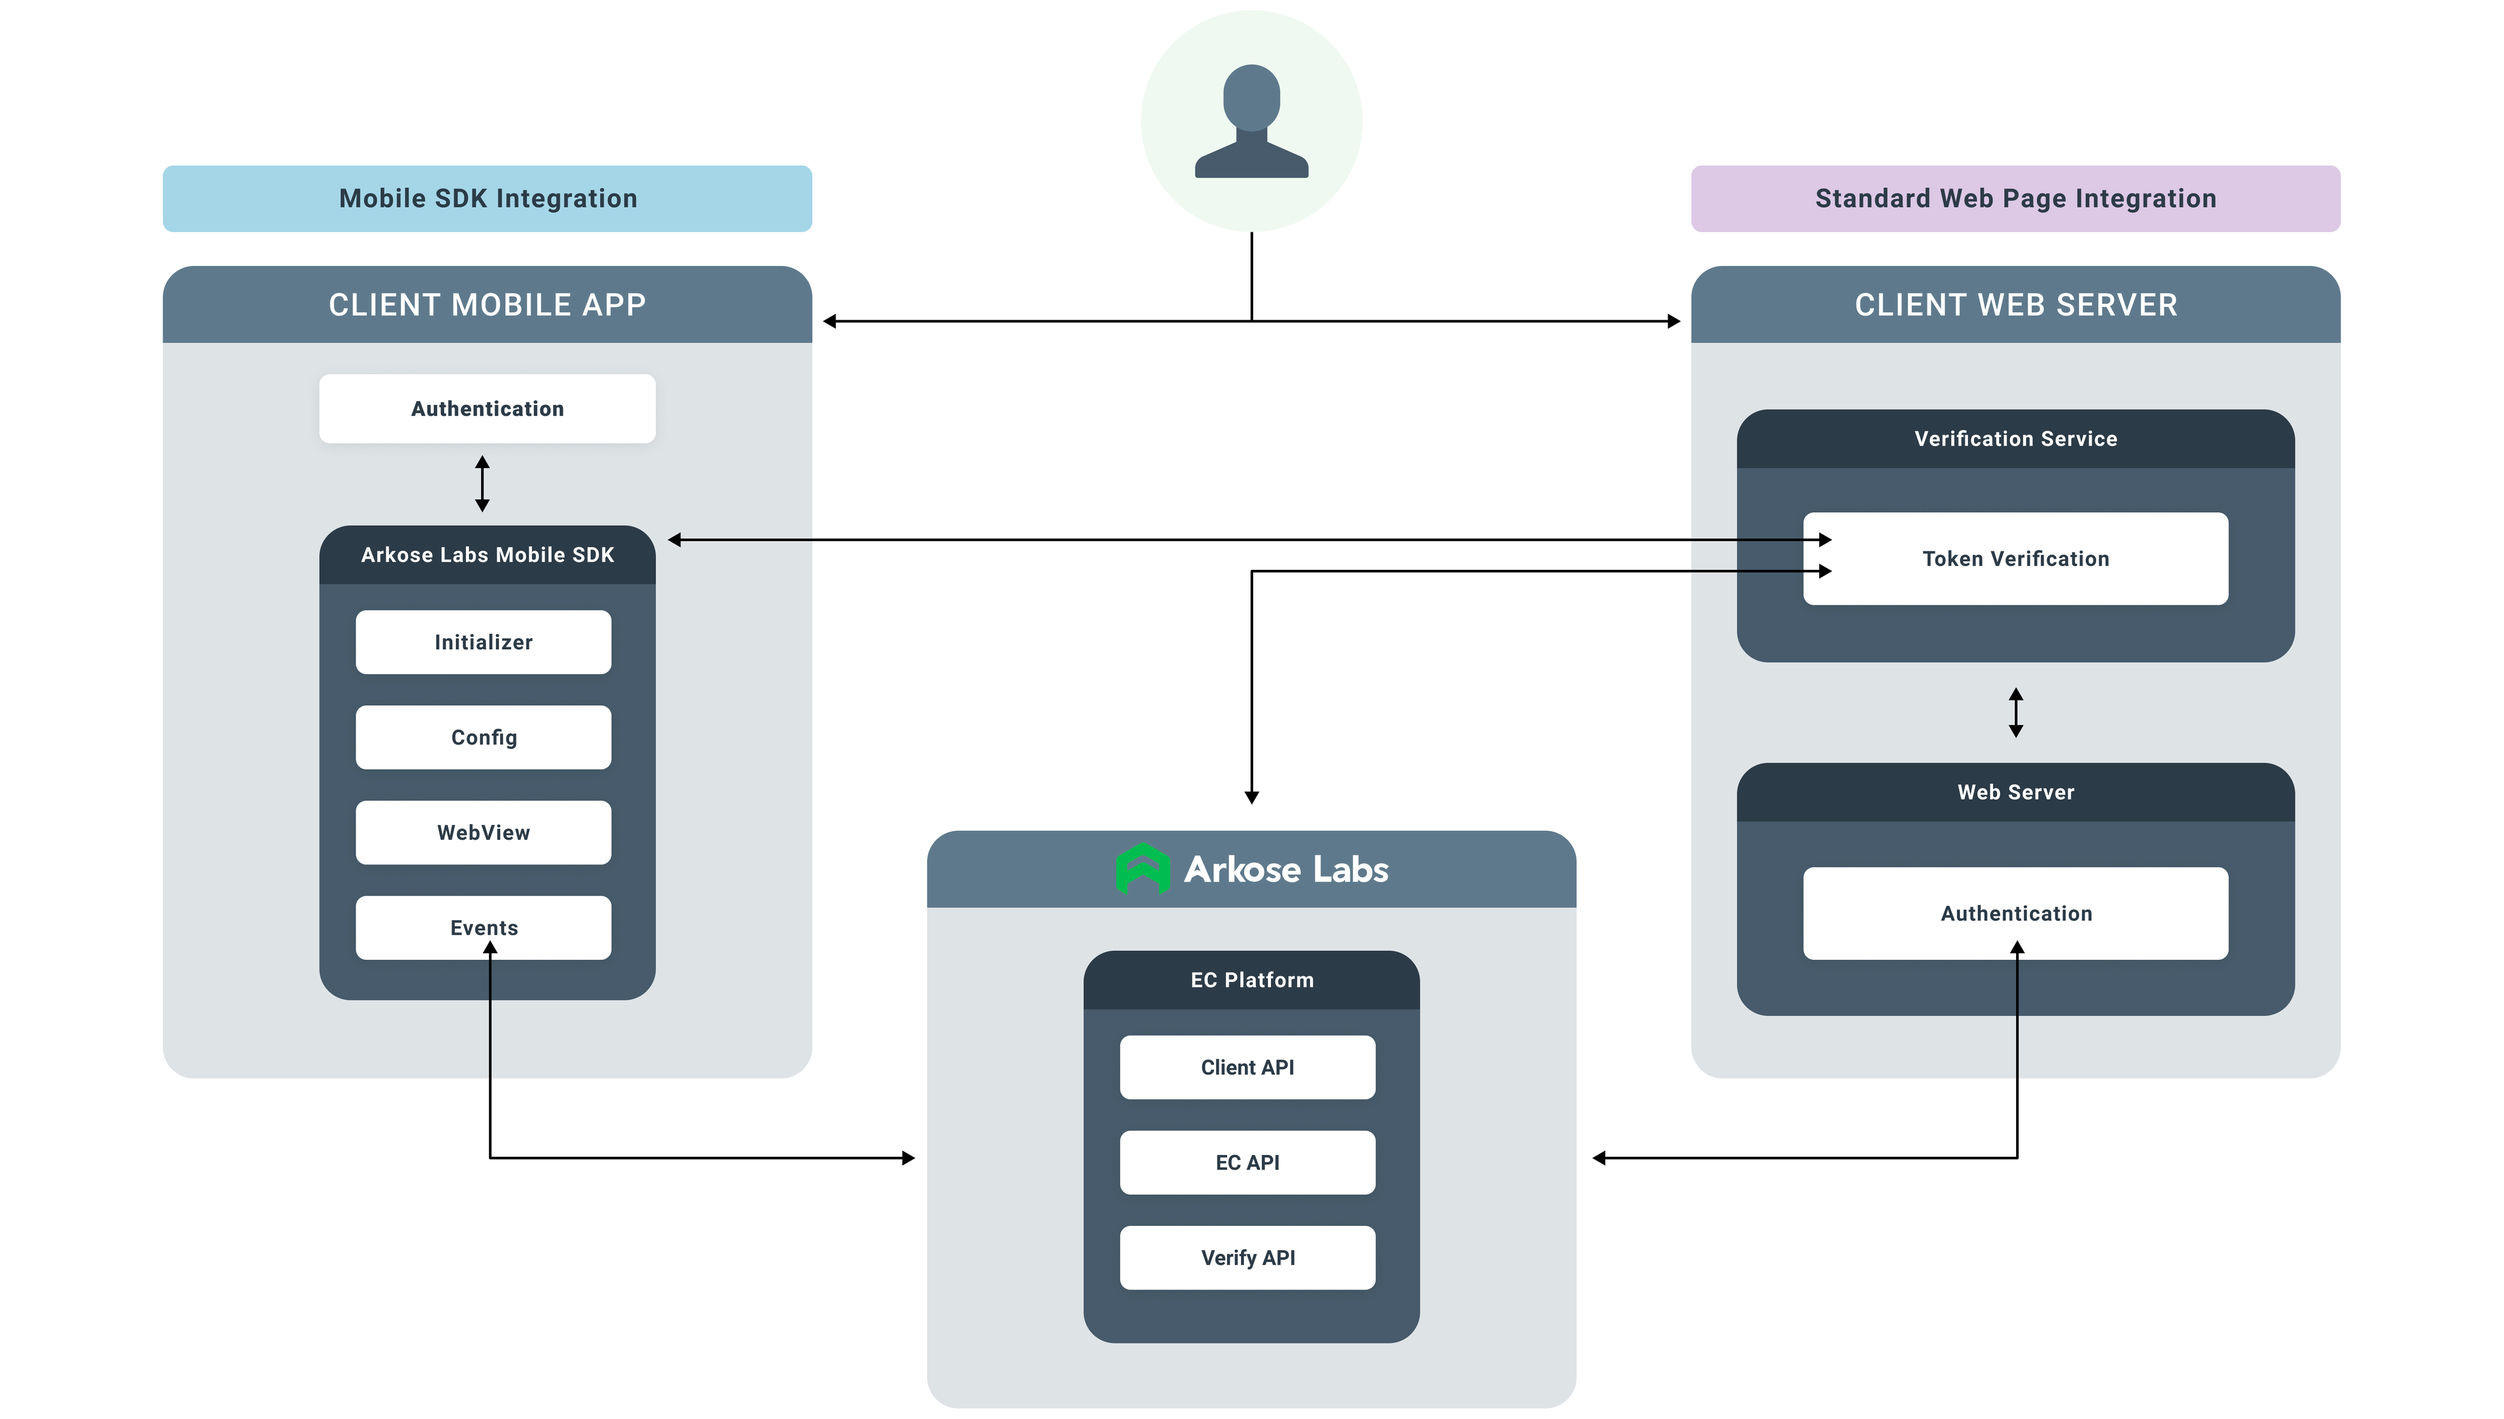
Architecture
The SDK uses a React Native Bridge to enable communication between the React Native JavaScript layer and the native iOS/Android SDKs. All existing detection and challenge features on our native Android/iOS SDKs are also available in the React Native SDK.
Security
The SDK is reviewed by Arkose Labs Security and complies with the respective guidelines of the Apple App Store and Google Play Store. The SDK ensures secure handling of challenges and user interactions, adhering to industry standards for data protection and safety.
Performance
We created the Arkose Labs Mobile SDKs with stability and performance in mind. Their use has no significant impact on the host application’s performance.
Installation
Follow the steps below to set up the ArkoseLabs SDK for React Native in your host application. These steps apply to both iOS and Android, covering detection and enforcement components.
Prerequisites
Ensure you have the following installed:
- React Native: Follow the React Native Documentation guide to set up your environment for iOS and Android.
- Xcode (for iOS development).
- Android Studio (for Android development).
- For the full end-to-end Arkose setup, you must also complete the standard Arkose Server-Side setup instructions.
Steps for Integration
Step 1: Download the SDK .tgz File
The Arkose Labs Mobile SDKs are available via the Mobile SDK's Support page. Please talk with your CSM (Customer Success Manager) about your intended usage and request access.
Download the SDK .tgz file from the appropriate source and place it inside the app/lib directory of your project.
Step 2: Clean the Environment
Before setting up the app, clean up any existing dependencies and previous builds:
# Remove node_modules and lock files
rm -rf node_modules
rm package-lock.json
npm cache clean --force
Step 3: Install Dependencies
Install the necessary dependencies for the app:
npm installStep 4: Install SDK .tgz File
There are two options for installing the SDK:
Option 1: Using npm install directly
npm install directlyYou can directly install the SDK .tgz file with the following command:
npm install ./lib/react-native-arkoselabs-x.x.x.tgzThis assumes the .tgz file is placed in the lib directory of your project.
Option 2: Manually Editing package.json
package.jsonAlternatively, you can modify the package.json file to include the SDK as a local dependency. Add the following line to the dependencies section of your package.json:
"react-native-arkoselabs": "file:./lib/react-native-arkoselabs-x.x.x.tgz"Then, run the following command to install dependencies:
npm installSetup Instructions - iOS
Step 1: Clean iOS Environment
Before setting up the iOS-specific configuration, clean the environment to remove old dependencies and builds:
# For iOS, clean the Pods
cd ios
pod deintegrate
pod cache clean --all
rm Podfile.lock
cd ..
Step 2: Update Podspec for Local SDK
Ensure the app references the local SDK .tgz file. Modify the react-native-arkoselabs.podspec file located at app/node_modules/react-native-arkoselabs/react-native-arkoselabs.podspec to point to the correct location of the .tgz file:
v2.12.1 and above:
From v2.12.1, Arkose Labs React Native SDK now supports relative paths in Podspec file declarations, eliminating the previous absolute path requirement.
s.source = { :http => "file://#{File.expand_path('../../lib/react-native-arkoselabs-x.x.x.tgz', __dir__)}" }Make sure you replace the x.x.x with the appropriate version of the ArkoseLabs React Native SDK.
v2.12.0 and below:
s.source = { :http => 'file:///{project-location}/app/lib/react-native-arkoselabs-x.x.x.tgz' }Make sure you replace the x.x.x with the appropriate version of the ArkoseLabs React Native SDK.
Replace {project-location} with the absolute path to your project. For example, if your project is located at /Users/yourname/projects/, the path would be:
s.source = { :http => 'file:///Users/yourname/projects/app/lib/react-native-arkoselabs-x.x.x.tgz' }Step 3: Modify Podfile
After target 'YourProject' do in the app/ios/Podfile, make sure you add this line to include the pod:
pod 'react-native-arkoselabs', :podspec => '../node_modules/react-native-arkoselabs'Then, install the iOS Pods:
cd ios
pod install
cd ..
Step 4: Link the SDK to Your App
Link the ArkoseLabs framework in Xcode:
- Open the iOS workspace in Xcode by running the following command:
- In Xcode, link the ArkoseLabs framework in both the Pods project settings and the YourProject settings.
- Set Embed Settings:
- Pods →
react-native-arkoselabsmodule: Link theArkoseLabsKit.xcframeworkand set it to "Do Not Embed". - In YourProject module: Link the
ArkoseLabsKit.xcframeworkand set it to "Embed & Sign". (if required)
- Pods →
Step 5: Run the App
Start the development server with a reset cache to avoid common issues:
npx react-native start --reset-cacheIf you encounter a Watchman error (e.g., "EMFILE: too many open files, watch"), clear the Watchman watches:
watchman watch-del-allAfter starting the server, press i in the terminal to run the app on iOS. If a scheme error occurs:
- Open Xcode and delete Settings → Locations → Derived Data.
- Clean the build folder in Xcode:
Shift+Command+K - Rebuild the app in Xcode:
Command+B - Run the app again:
Command+R
Setup Instructions - Android
Step 1: Clean Android Environment
Before setting up the Android-specific configuration, clean the environment to remove old dependencies and builds:
# For Android, remove Arkose local maven
cd android
./gradlew clean
rm -rf arkoseLib
cd ..
Step 2: Configure Android Maven Publish Plugin
In the project-level build.gradle file, add the following configuration:
apply plugin: "maven-publish"
publishing {
  publications {
    arkoseAar(MavenPublication) {
      groupId = 'com.arkoselabs'
      artifactId = 'android-sdk'
      version = 'x.x.x'
      artifact("../node_modules/react-native-arkoselabs/android/libs/ArkoseLabsSDK.aar")
    }
  }
  repositories {
    maven {
      url = uri("$rootDir/arkoseLib")
    }
  }
}
tasks.register("publishArkoseLib") {
  dependsOn("publishArkoseAarPublicationToMavenRepository")
  group = "publishing"
  description = "Publishes the Arkose Labs SDK to the local Maven repository in /arkoseLib"
}
Step 3: Publish the Maven Artifact
Run the following command in your terminal:
cd android
./gradlew publishArkoseLib
cd ..
The published file will be located in the arkoseLib folder under your project’s root directory (rootDir), which is where the project-level build.gradle or settings.gradle file is located.
This step is important for syncing the Arkose dependencies in the app-level build.gradle file.
Step 4: Configure Maven Repository
In the settings.gradle file, add the following configuration above rootProject.name = 'YourProject':
dependencyResolutionManagement {
    repositoriesMode.set(RepositoriesMode.PREFER_SETTINGS)
    repositories {
        google()
        mavenCentral()
        maven {
          url uri("$rootDir/arkoseLib")
        }
    }
}
Step 5: Add Arkose SDK Dependencies
In the app-level build.gradle file, add the following lines to the dependencies block:
// Arkose SDK
implementation 'com.arkoselabs:android-sdk:x.x.x'
Step 6: Steps for Gradle Versions Below 8.5 (Optional)
If the automatic linking does not happen in Gradle versions below 8.5, follow these additional steps:
- In the
settings.gradleof the project, add the following line afterinclude ':app':include ':react-native-arkoselabs' project(':react-native-arkoselabs').projectDir = new File(rootProject.projectDir, '../node_modules/react-native-arkoselabs/android') - In the app-level
build.gradle, add the following implementation line under the dependencies section:// Arkose SDK implementation project(':react-native-arkoselabs') // Add this line implementation 'com.arkoselabs:android-sdk:x.x.x' - In the app's
src/.../MainApplication, insert the following line inside thePackageList(this)block:override val reactNativeHost: ReactNativeHost = object : DefaultReactNativeHost(this) { override fun getPackages(): List<ReactPackage> = PackageList(this).packages.apply { // Packages that cannot be autolinked yet can be added manually here, for example: // add(MyReactNativePackage()) add(RNArkoseManagerPackage()) // Add this line } override fun getJSMainModuleName(): String = "index" override fun getUseDeveloperSupport(): Boolean = BuildConfig.DEBUG override val isNewArchEnabled: Boolean = BuildConfig.IS_NEW_ARCHITECTURE_ENABLED override val isHermesEnabled: Boolean = BuildConfig.IS_HERMES_ENABLED }
Step 7: Sync your project with Gradle files
In Android Studio, go to the toolbar, click on File, and then select Sync Project with Gradle Files.
Step 8: Run the App
Start the development server with a reset cache to avoid common issues:
npx react-native start --reset-cacheIf you encounter a Watchman error (e.g., "EMFILE: too many open files, watch"), clear the Watchman watches:
watchman watch-del-allAfter starting the server, press a in the terminal to run the app on Android. If you encounter Gradle or JDK-related errors, open the project in Android Studio:
- Ensure the development server is running.
- Sync Gradle files.
- Clean, build and run the app directly from Android Studio.
Code Snippets
Initialize SDK
Here’s how you initialize the ArkoseLabs SDK with configuration settings. This setup is crucial for using any of the SDK's features.
import { ArkoseEvents, ArkoseManager } from "../node_modules/react-native-arkoselabs/src";
const arkoseConfig = {
  apiKey: 'your-api-key',              // Your API key from Arkose Labs
  apiBaseUrl: '<Actual API Base URL>', // Optional: Set the API base URL
  language: '',                         // Optional: Set language
  clientAPIRetryCount: 0,               // Optional: Number of retries on client-side errors
  styleTheme: '',                       // Optional: Set style theme
};
const initializeArkose = () => {
  ArkoseManager.initialize(arkoseConfig);
};
Show Enforcement Challenge
To show the enforcement challenge, use the following function. It also accepts optional parameters like the cancelButtonTitle or resetButtonTitle, which are applicable only on iOS.
import { ArkoseEvents, ArkoseManager } from "../node_modules/react-native-arkoselabs/src";
import { Platform } from "react-native";
// Define conditional enforcement parameters based on the platform
const enforcementParams = Platform.OS === "ios" ? {
  cancelButtonTitle: "Cancel", // Only for iOS
  resetButtonTitle: "Reset",  // Only for iOS
} : {};
// Function to show the enforcement challenge
const showEnforcementChallenge = () => {
  ArkoseManager.showEnforcementChallenge(enforcementParams);
};
// Example usage:
<Button onPress={showEnforcementChallenge} title="Show Challenge" />
Arkose Events
The SDK emits several events that can be used to track the state of the challenge and other operations. Here are the available events:
import { ArkoseEvents, ArkoseManager } from "../node_modules/react-native-arkoselabs/src";
import React from "react";
import { Alert } from "react-native";
React.useEffect(() => {
  // Optional: Set log level for informational logs
  ArkoseManager.setLogLevel("info");
  // Add event listeners
  ArkoseEvents.addListener("onReady", () => console.log("SDK is ready to trigger the challenge"));
  ArkoseEvents.addListener("onShow", () => console.log("Challenge is starting to show"));
  ArkoseEvents.addListener("onShown", () => console.log("Challenge is fully rendered"));
  ArkoseEvents.addListener("onHide", () => console.log("Challenge has been hidden"));
  ArkoseEvents.addListener("onSuppress", () => console.log("Challenge is suppressed"));
  ArkoseEvents.addListener("onCompleted", (result) => {
    console.log("Challenge completed successfully", result);
    Alert.alert("Challenge Completed", JSON.stringify(result));
  });
  ArkoseEvents.addListener("onFailed", (result) => {
    console.log("Challenge failed", result);
    Alert.alert("Challenge Failed", JSON.stringify(result));
  });
  ArkoseEvents.addListener("onError", (result) => {
    console.error("An error occurred during the challenge", result);
    Alert.alert("Error", JSON.stringify(result));
  });
  ArkoseEvents.addListener("onWarning", (result) => {
    console.warn("A warning was triggered", result);
  });
  ArkoseEvents.addListener("onResize", (result) => {
    console.log("Challenge resized", result);
  });
}, []);
Note that Arkose’s detection component is part of our overall Arkose Bot Manager platform. Thus the names of some methods and variables refer only to enforcement when actually dealing with detection as well. Unless otherwise specified, the configuration components apply to both detection and enforcement components, although perhaps in different ways as specified.
Event Name | Description | Applicable Component |
|---|---|---|
| Listener function invoked when the Enforcement or Detection is ready. The Enforcement or Detection cannot be triggered before this event. You may want to disable the UI you are protecting until this event has been triggered. | Detection |
| Listener function invoked when the Enforcement or Detection is completed. The function is also invoked when an Enforcement Challenge or detection is re-displayed (e.g. if the user closes the EC or detection view and tries to continue). Note that the close button only appears when in Lightbox mode. | Detection |
| Listener function invoked when the Enforcement Challenge or Detection is displayed. The function is only invoked the first time an Enforcement Challenge is displayed. | Enforcement |
| Listener function invoked when either: a. For the enforcement component, a session is classified as not needing a challenge or a challenge has been successfully completed. b. For the detection component, a session detection has been successfully completed. c. A Response Object is passed to this function. | Detection |
| Listener function invoked when the EC or detection view is hidden. For example, this happens after an EC or detection is completed or if the user clicks the close button. Note that the close button only appears when in Lightbox mode. | Detection |
| Listener function invoked when: a. The Enforcement Challenge is suppressed (i.e. A session was classified as not requiring a challenge). b. The Detection is running is analyzing the user intent. | Detection |
| Listener function invoked after the Enforcement resets. Typically occurs after a challenge has been successfully answered. | Enforcement |
| Listener function invoked when an error occurs when loading the challenge or detection. A Response Object is passed to this function. | Detection |
| Listener function invoked when a challenge has failed (the user has failed the challenge multiple times and is not allowed to continue the session). A Response Object is passed to this function. | Enforcement |
ArkoseConfig Configuration
ArkoseConfig ConfigurationParameter Name | Description |
|---|---|
apiKey | Public key for your account, required for authentication with Arkose Labs. |
apiBaseUrl | Base URL of Arkose Bot Manager as supplied by Arkose Labs. |
blobData | Mainly used to share any client encrypted data blobs with Arkose Bot Manager. It is optional.
Default: |
language | Language setting for the Enforcement Challenge. Defaults to |
userAgent | Specify any userAgent setting for ease of testing forced Enforcement Challenge for a session. It is optional. |
noSuppress | Optionally suppress the challenge if not needed. Set to |
clientAPIRetryCount | Specify the number of retries for network issues when connecting to the |
styleTheme | Style theme setting for the Enforcement Challenge UI. |
References
- React Native Documentation
Official guide for setting up and developing React Native apps. - Arkose Labs SDK Documentation
Comprehensive documentation for integrating Arkose Labs' bot mitigation and fraud prevention. - Android Mobile SDK
Documentation for integrating Arkose Labs' Android SDK. - iOS Mobile SDK
Documentation for integrating Arkose Labs' iOS SDK.
Updated 4 months ago