Server-Side Instructions
Overview
📘About this page and the Verify API v4 (click arrow to expand/collapse)
This document is for Server-Side processing using Arkose Labs Verify API Version 4.
The latest Verify API version (v4) includes integrated IP Intelligence and enriched Fingerprint information as a part of the Verify response. Please review the changes to the response schema before upgrading from a previous version or consult with your CSM.
There are two steps required to fully implement Arkose Bot Manager:
-
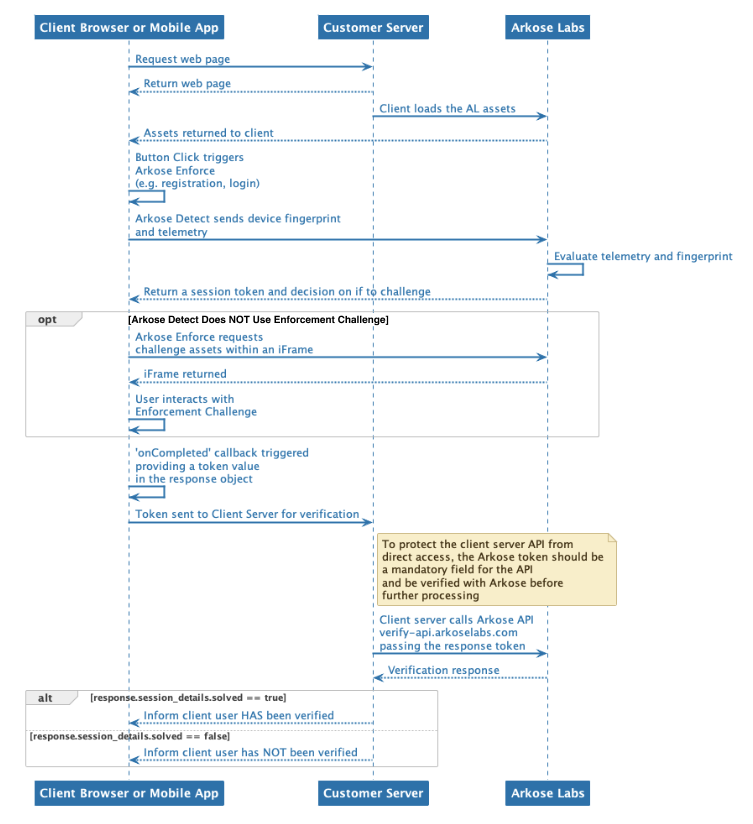
Client-side implementation that allows Arkose Bot Manager to collect data necessary to classify the traffic from the client, display an Enforcement Challenge (EC) if necessary, and provide a one-time use token.
-
Server-side implementation that takes the token provided by the client-side and verifies it with the Verify API. The result is a response that contains information about the session.
This guide documents the steps required to implement the server-side verification. If you are using a Content Delivery Network (CDN), either Akamai, Fastly or Cloudflare, your server-side setup is a bit different. Please see Content Delivery Network Setup.
Detailed information on implementing Arkose Bot Manager client-side processing can be found in Setting Up Arkose Bot Manager.

API Request Authentication
Arkose Labs authenticates your API requests using a private/public key pair that can be retrieved from the Keys section of the Arkose Labs Command Center. To view the Keys section, go to the left menubar's Setup entry, and then to the Keys sub-entry. If you do not have access to the Command Center or do not have your private and public keys, please contact your Customer Success Manager.
The private key is needed to authenticate when using the Verify API. This private key must not be published on a client facing website, and must only be used on your server-side implementation on the Verify API.
Implementing the Server-Side
You actually do not need to "install" anything to implement Arkose Bot Manager on the server-side. Rather, what you need to do is add calls to your application's code that take the token returned from having called the Arkose Client API (see Client API) and verify it by using it as a parameter in a call to the Arkose Verify API. Depending on the call's result, you either allow the user to continue, or in case of an invalid response, stop them from going further in your application's workflow.
The reason for the verification step is to ensure that the user cannot proceed with their action unless their session is valid. Each response.token provided by the Client API can only be used once with the Verify API. This means that a solved session token cannot be reused to bypass Arkose Labs' challenges. If the token is used again, the Verify API response will identify that the token has already been verified.
Whenever you make a call to the Verify API, check its response. Allow the user to continue ONLY if the response's session_details.solved field value is true. Any other value means the user's response was invalid.
In addition to whether the session was valid, the Verify response contains considerable data and information about the session, such as:
- Session details
- Fingerprints information broken into three categories
- Browser characteristics
- Device characteristics
- User preferences
- IP Intelligence
It is up to you how to process the response and its fields and what you do with the information.
Verify response processing code MUST gracefully handle unknown fieldsArkose Labs reserves the right to add additional fields to the Verify API response schema. In fact, currently there are add-on abilities which, if activated, add fields to the response.
Thus, your code to process and handle Verify responses must gracefully handle any unknown-to-it fields it may encounter; i.e. instead of aborting with an error, it should just ignore an unknown field.
For More Verify API Details
The following pages provide reference level details about how to call Verify and interpret its responses.
- How to call the Verify API
- Verify Request and Response Schemas
- Verify API Response Fields and Examples
Optionally, you can add the following to your Verify API response:
Updated 10 months ago