
Vue Setup Guide
Overview
This page describes how to use the Arkose Fraud Detection Platform (Arkose Platform) JavaScript API with single page applications (SPA) built using Vue.
Prerequisite: API Request Authentication Private/Public Key Pair
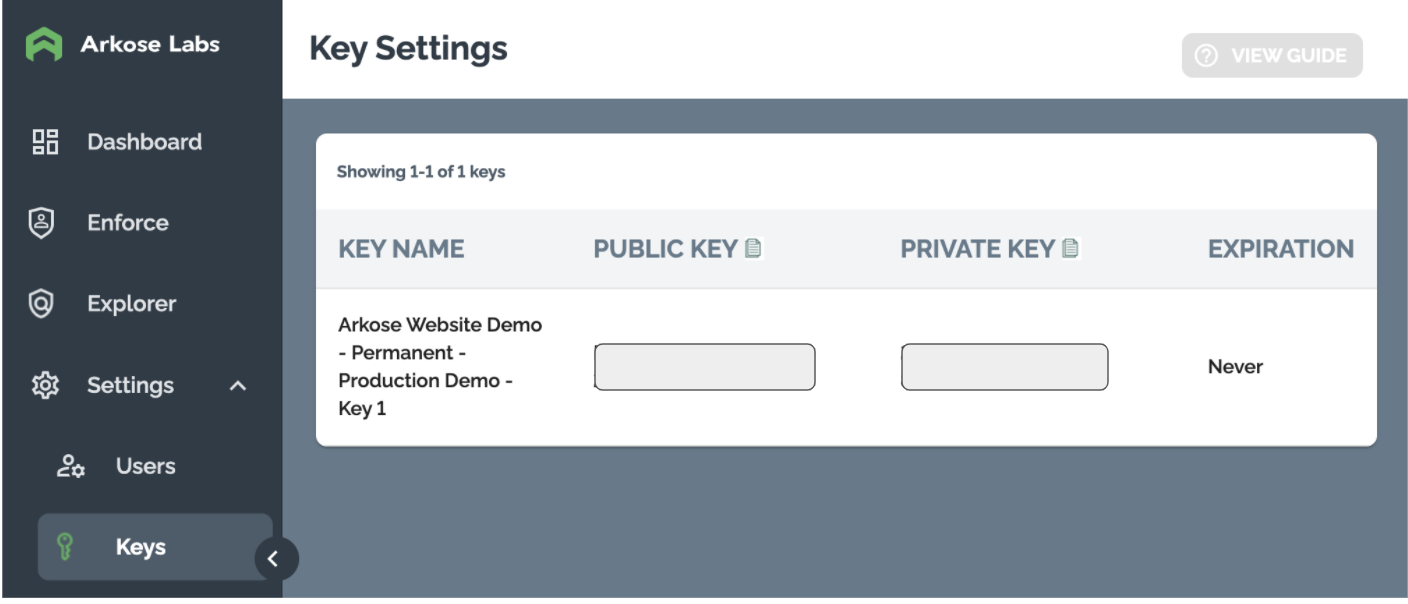
Arkose Labs authenticates your API requests using a private/public key pair retrievable from the Arkose Labs Command Center. To get the key pair, go to the left menubar's Settings entry and then to its Keys sub-entry. If you do not have access to the Command Center or do not have your private and public keys, contact your Arkose Sales Rep or Solution Consultant.
You need the private key to authenticate when using the Arkose Verify API. This private key must NOT be published on a client facing website, and must only be used on your Verify API server-side implementation.
Loading the API
Your SPA loads the Arkose Bot Manager API via a <script> tag. It contains:
- The Arkose Bot Manager API's URL.
- Your public key from the Arkose Labs Command Center.
- As the value of
data-callback, the name of a JavaScript function that configures the Arkose Bot Manager client API.
Full details about the script tag and function are in the Client-Side Instructions.
Remember to replace <company> with your company's personalized Client API URL name, and replace <YOUR_PUBLIC_KEY> with the public key supplied to you by Arkose Labs.
<script src="https://<company>-api.arkoselabs.com/v2/<YOUR_PUBLIC_KEY>/api.js" data-callback="setupEnforcement" />
Implementing Arkose Labs in Vue
We present an example of how to implement Arkose Labs in Vue, covering both modal/lightbox mode and inline mode. It is located in Arkose's GitHub repo at: Vue Example
Warning: Arkose strongly encourages you to develop in Modal rather than Inline. If you think you have to use Inline, please talk to your Arkose rep about it.
The example project provides a simple Vue component that wraps around Arkose's Client API. It contains a shared Arkose component, which allows for passing in different public keys and modes (lightbox or inline).
The README.md file contains instructions for how to install dependencies and run the example. When Arkose Verification/Challenge is completed on the login page, it navigates to http://localhost:8080/dashboard.
- Login page (
/): Arkose Enforcement Challenge over a Modal (lightbox) mode. To see the Arkose modal version, go tohttp://localhost:8080/ - Forgot Password page (
/forgot-password): Arkose Enforcement Challenge in Inline mode. To see the Inline version, go tohttp://localhost:8080/forgot-password
Step 1: Adding Your Public Key(s) to the Environment
In the example, the Login and Forgot Password components read the public key from process.env.VUE_APP_ARKOSE_PUBLIC_KEY, which is defined in .env.
Below is the example content of the .env file:
# Replace <YOUR_PUBLIC_KEY> with the public key that has been setup for your account
VUE_APP_ARKOSE_PUBLIC_KEY='<YOUR_PUBLIC_KEY>'
Vue CLI only exposes environment variables to the client that are prefixed with
VUE_APP_.
Adding Multiple Keys to the Environment
Note that you can define multiple public key variables in the .env file. For example, you could define a login Arkose key with one public key variable used for login workflows, and a separate key for registration workflows. Shown here is .env after adding an additional login Arkose key:
# Replace <YOUR_PUBLIC_KEY_1> and <YOUR_PUBLIC_KEY_2> with the public keys that have been setup for your account
VUE_APP_ARKOSE_PUBLIC_KEY='<YOUR_PUBLIC_KEY_1>'
VUE_APP_LOGIN_ARKOSE_PUBLIC_KEY='<YOUR_PUBLIC_KEY_2>'
Step 2: Injecting the Arkose Labs Script
The next step is to inject the Arkose Labs script into your Vue component. To do this, copy and paste the example code in src/components/Arkose.vue shown below where needed in your application's code, typically in the components folder.
Warning: Remember to replace<company>with your company's personalized Client API URL name. (See Vanity URLs in the Knowledge Base (support login required) for details)
<template>
  <div
    v-if="mode === 'inline'"
    :id="selector?.slice(1)"
  />
</template>

<script>
export default {
  name: 'Arkose',
  props: {
    publicKey: {
      type: String,
      default: ''
    },
    mode: {
      type: String,
      default: ''
    },
    selector: {
      type: String,
      default: null // Any valid DOM selector is allowed here
    },
    nonce: {
      type: String,
      default: ''
    }
  },
  data () {
    return {
      scriptId: ''
    };
  },
  methods: {
    removeScript () {
      const currentScript = document.getElementById(this.scriptId);
      if (currentScript) {
        currentScript.remove();
      }
    },
    // Append the JS tag to the Document Body.
    loadScript (publicKey, nonce) {
      this.removeScript();
      const script = document.createElement('script');
      script.id = this.scriptId;
      script.type = 'text/javascript';
      script.src = `https://<company>-api.arkoselabs.com/v2/${publicKey}/api.js`;
      script.setAttribute('data-callback', 'setupEnforcement');
      if (nonce) {
        script.setAttribute('data-nonce', nonce);
      }
      document.body.appendChild(script);
      return script;
    },
    setupEnforcement (myEnforcement) {
      window.myEnforcement = myEnforcement;
      window.myEnforcement.setConfig({
        selector: this.selector,
        mode: this.mode,
        onReady: () => {
          this.$emit('onReady');
        },
        onShown: () => {
          this.$emit('onShown');
        },
        onShow: () => {
          this.$emit('onShow');
        },
        onSuppress: () => {
          this.$emit('onSuppress');
        },
        onCompleted: (response) => {
          this.$emit('onCompleted', response.token);
        },
        onReset: () => {
          this.$emit('onReset');
        },
        onHide: () => {
          this.$emit('onHide');
        },
        onError: (response) => {
          this.$emit('onError', response);
        },
        onFailed: (response) => {
          this.$emit('onFailed', response);
        }
      });
    }
  },
  mounted () {
    this.scriptId = `arkose-script-${this.publicKey}`;
    const scriptElement = this.loadScript(this.publicKey, this.nonce);
    // This will inject required html and css after the Arkose script is properly loaded
    scriptElement.onload = () => {
      console.log('Arkose API Script loaded');
      window.setupEnforcement = this.setupEnforcement.bind(this);
    };
    // If there is an error loading the Arkose script this callback will be called
    scriptElement.onerror = () => {
      console.log('Could not load the Arkose API Script!');
    };
  },
  destroyed () {
    if (window.myEnforcement) {
      delete window.myEnforcement;
    }
    if (window.setupEnforcement) {
      delete window.setupEnforcement;
    }
    this.removeScript();
  }
};
</script>
Example: Injecting Arkose Labs into the application (Modal mode)
For an example of how Arkose Labs is injected into the application for a Login page, see src/components/Login.vue.
<template>
  <div>
    <h2>Login</h2>
    <Arkose
      :public-key="publicKey"
      mode="lightbox"
      @onCompleted="onCompleted($event)"
      @onError="onError($event)"
    />
    <input type="text" id="email" name="email" placeholder="Email">
    <input type="text" id="password" name="password" placeholder="Password">
    <input type="submit" @click="onSubmit()" value="Submit">
    <nav>
      <router-link to="/forgot-password">
        Forgot Password
      </router-link>
    </nav>
  </div>
</template>

<script>
import router from '../router.js';
import Arkose from './Arkose.vue';

export default {
  name: 'LoginComponent',
  components: {
    Arkose
  },
  data () {
    return {
      publicKey: process.env.VUE_APP_ARKOSE_PUBLIC_KEY,
      arkoseToken: null
    };
  },
  methods: {
    onCompleted (token) {
      this.arkoseToken = token;
      router.replace({ path: '/dashboard' });
    },
    onError (errorMessage) {
      alert(errorMessage);
    },
    onSubmit () {
      if (!this.arkoseToken) {
        window.myEnforcement.run();
      }
    }
  }
};
</script>
Example: Injecting Arkose Labs into the application (Inline mode)
For an example of Inline mode, see src/components/ForgotPassword.vue. Note that the mode prop is set to inline and a selector is supplied - this is the DOM element the challenge renders into, and the Submit button stays disabled until onCompleted fires.
<template>
  <div>
    <h2>Forgot Password</h2>
    <Arkose
      :public-key="publicKey"
      mode="inline"
      selector="#arkose-ec"
      @onCompleted="onCompleted($event)"
      @onError="onError($event)"
    />
    <input type="text" id="email" name="email" placeholder="Email">
    <input
      type="submit"
      @click="onSubmit()"
      value="Submit"
      :disabled="!arkoseToken"
    >
    <nav>
      <router-link to="/">
        Login
      </router-link>
    </nav>
  </div>
</template>

<script>
import router from '../router.js';
import Arkose from './Arkose.vue';

export default {
  name: 'ForgotPassword',
  components: {
    Arkose
  },
  data () {
    return {
      publicKey: process.env.VUE_APP_ARKOSE_PUBLIC_KEY,
      arkoseToken: null
    };
  },
  methods: {
    onCompleted (token) {
      this.arkoseToken = token;
    },
    onError (errorMessage) {
      alert(errorMessage);
    },
    onSubmit () {
      if (!this.arkoseToken) return;
      router.replace({ path: '/' });
    }
  }
};
</script>
Step 3: Callback Functions and Event Emitters
When the script is injected, the public key stored in the environment file is passed along with it. Once the script is loaded, the workflow binds the callback function to a Window object. See first Client API: API Callbacks for general details about Arkose Client API callbacks, followed by Callbacks for specific descriptions of the various callbacks.
Unlike React (which passes callbacks in as props), the Vue Arkose component emits each callback as a custom event via this.$emit(...). The parent component then listens for these events using Vue's v-on (@) syntax and binds its own handler methods, for example:
<Arkose
  :public-key="publicKey"
  mode="lightbox"
  @onCompleted="onCompleted($event)"
  @onError="onError($event)"
/>methods: {
onCompleted (token) {
this.arkoseToken = token;
router.replace({ path: '/dashboard' });
},
onError (errorMessage) {
alert(errorMessage);
}
}In particular, note the definition of onCompleted, where we handle receiving the response token from the Arkose Verify API and navigating to the next page.
The full list of callback functions and event emitters can be found in the example code above for src/components/Arkose.vue.
Summary
To use the Arkose Bot Manager in a Vue SPA, you need to do the following as part of the SPA's definition.
- Place all Arkose public keys you need to use (one per workflow) in environment variables, prefixed with
VUE_APP_. - Cut and paste the
Arkose.vuecomponent where needed in your application's code, typically in thecomponentsfolder. - In each parent component, bind the callback events (
@onCompleted,@onError, etc.) emitted by theArkosecomponent and define what they do when triggered - e.g.Login.vueandForgotPassword.vue.
Updated about 1 month ago